
[Special thanks to Jason Edelman for his kind help and support during all the stages of this article. I’d have not written this without his precious suggestions and hints!]
It’s been a while since my last post. I’ve been really busy lately with work, study and other projects and I have not found the time to write something here, even if I wanted to post this article at least one month ago. Anyway, welcome back to me 🙂
Back to the start of December, Jason Edelman published another awesome blog post on Network Automation and Ansible. There he wrote an Ansible playbook to:
- Discover the device using snmp_device_version from Patrick Ogenstad.
- Discover the LLDP neighbors of the device using ntc-ansible.
- Configure the interface descriptions using the nxos_interface Ansible module.
This is pretty damn cool! Here you can see the whole magic playbook:
---

  - name: AUTO CONFIGURE PORT DESCRIPTIONS
    hosts: cisco
    gather_facts: no
    connection: local

    tasks:

      - name: GET SNMP DISCOVERY INFORMATION
        snmp_device_version: host={{ inventory_hostname }} community=networktocode version=2c
        tags:
          - snmp
          - neighbors

      - name: GET LLDP NEIGHBORS
        ntc_show_command:
          connection=ssh
          platform={{ ansible_device_vendor }}_{{ ansible_device_os }}
          template_dir='/home/ntc/library/ntc-ansible/ntc_templates'
          command='show lldp neighbors'
          host={{ inventory_hostname }}
          username={{ un }}
          password={{ pwd }}
        register: neighbors
        tags: neighbors

      - name: CONFIGURE PORT DESCRIPTIONS USING NEIGHBOR DATA
        nxos_interface:
          interface={{ item.local_interface  }}
          description="Connects to {{ item.neighbor_interface }} on {{ item.neighbor }}"
          host={{ inventory_hostname }}
          username={{ un }}
          password={{ pwd}}
        with_items: neighbors.response
If you run this, you’ll see Ansible dynamically configuring your Nexus interfaces. How cool is this? 🙂
It’s that cool that I wanted to try it in a multivendor environment, adding a couple of Arista switches. So I did, and this is the playbook I used:
---
 - name: Auto-configure port descriptions
   hosts: all
   gather_facts: no
   connection: local

   tasks:
     - name: GET SNMP DISCOVERY INFORMATION
       snmp_device_version: host={{ inventory_hostname }} community=networktocode version=2c

     - name: GET NEIGHBOR INFORMATION
       ntc_show_command:
         connection=ssh
         platform={{ ansible_device_vendor }}_{{ ansible_device_os }}
         template_dir='./ntc_templates'
         command='show lldp neighbors'
         host={{ inventory_hostname }}
         username={{ un }}
         password={{ pwd }}
       register: neighbors

     - name: AUTO-CONFIGURE PORT DESCRIPTIONS FOR ARISTA
       eos_interface:
         name={{ item.local_interface }}
         description="Connects to {{ item.neighbor_interface }} on {{ item.neighbor }}"
         connection={{ inventory_hostname }}
       with_items: neighbors.response
       when: type == "arista"

     - name: AUTO-CONFIGURE PORT DESCRIPTIONS FOR CISCO
       nxos_interface:
         interface={{ item.local_interface }}
         description="Connects to {{ item.neighbor_interface }} on {{ item.neighbor }}"
         host={{ inventory_hostname }}
         username={{ un }}
         password={{ pwd}}
       with_items: neighbors.response
       when: type == "cisco"
The only difference, compared to the one from Jason, is the additional task to support Arista EOS and the when conditional to select the correct task based on vendor type. Anyway, when I run this, it didn’t work at all and below you can see the error it returns!
Let’s try to understand why focusing only on Arista now.
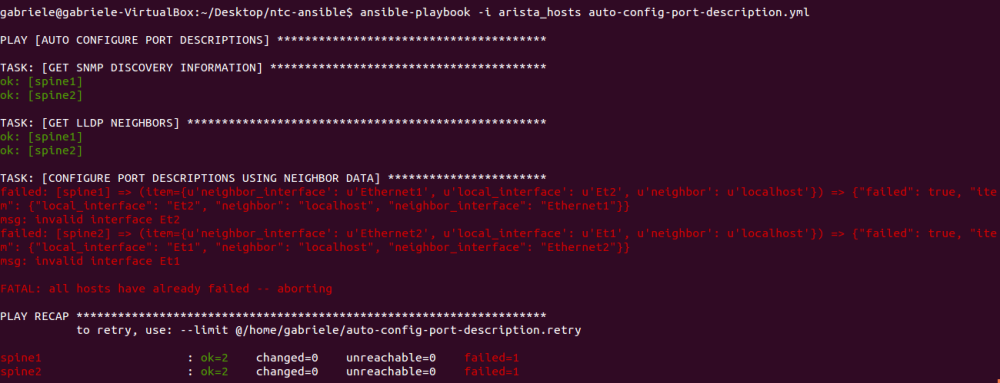
Why did it fail? The reason is pretty explicit if we read the error message from Ansible:
-
msg: invalid interface Et1
-
msg: invalid interface Et2
The problem is that Arista interfaces need to be entered using their full name. Neither Et or Eth are accepted and so the playbook fails as soon as it tries to access interface to configure descriptions.
Where do Et1 and Et2 come from? Let’s investigate a little bit more.
If we run the current playbook with a -v check, we’ll be able to see all the params returned from run:

Here we can see how Ansible discovers what kind of device are these in the first task. But here we are more interested on the second one. In fact, we can notice that local_interface param is set to Et1 and Et2. These values are returned by eos_interface and that’s where I’m gonna try to work to solve the issue.
Ansible Filters
From Ansible: Up and Running:
Filters are a feature of the Jinja2 templating engine. Since Ansible uses Jinja2 for evaluating variables, as well as for templates, you can use filters inside of {{ braces }} in your playbooks, as well as inside of your template files. Using filters resembles using Unix pipes, where a variable is piped through a filter.
What I want to do, is to build a filter to change what Ansible returns.
The basic syntaxt of a filter is this:
{{ some_variable | some_filter }}
Here, some_variable is a variable passed or returned back from Ansible. Then, we apply some_filter to our variable and the result is given back to us. Ansible already have lot of built-in filters and you can take a look at some of them here. But you can also develop your own custom filter! 😉
normalize_interface
This is the content of my normalize_interface.py file, which will become my filter:
from ansible import errors

interfaces = {
        'arista':   {
                    'et': 'Ethernet',
                    'ma': 'Management',
                    'lo': 'Loopback'
                },
        'hp':       {
                    'gi': 'GigabitEthernet',
                    'te': 'Ten-GigabitEthernet',
                    'fo': 'FortyGigE',
                    'lo': 'LoopBack',
                    'br': 'Bridge-Aggregation',
                    'ro': 'Route-Aggregation',
                    'tu': 'Tunnel'
                }
        }

def _get_interface(interface):
    splitted_interface = interface.split(' ')
    if len(splitted_interface) == 2:
        int_number = splitted_interface[-1].strip()
        int_type = splitted_interface[0].strip().lower()
        if len(int_type) > 2:
            int_type = int_type[0:2]
    else:
        for i in range(0, len(interface)):
            if interface[i].isdigit():
                int_type = interface[0:i].lower()
                if len(int_type) > 2:
                    int_type = int_type[0:2]
                int_number = interface[i::]
                break
    return (int_type, int_number)

def normalize_interface(interface, vendor):
    try:
        interface_type, interface_number = _get_interface(interface)

        interfaces_dict = interfaces[vendor]
        fixed_interface_type = interfaces_dict[interface_type]

        fixed_interface = fixed_interface_type + interface_number
        return fixed_interface
    except Exception, e:
        raise errors.AnsibleFilterError(
                'normalize_interface plugin error: {0}, interface={1},'
                'vendor={2}'.format(str(e), str(interface), str(vendor)))

class FilterModule(object):
    ''' A filter to fix interface's name format '''
    def filters(self):
        return {
            'normalize_interface': normalize_interface
        }
The normalized_interface function defines the Jinja2 filter. It accepts 2 params, interface and vendor which are passed in different ways (we’ll be back on this soon).
More from Ansible: Up and Running:
The FilterModule class defines a filters method that returns a dictionary with the name of the filter function and the function itself. The FilterModule class is Ansible-specific code that makes the Jinja2 filter available to Ansible.
{{ item.local_interface | normalize_interface("arista") }}
The above line is an examble of how to call the filter against an interface. As I said, the normalize_interface accepts 2 args: the first, item.local_interface, is passed automatically using the pipe “|“, while the second one, arista, is passed explicitly.
After the filter is called as above, the FilterModule class calls the proper function. Here, the first thing we do is to call another function, _get_interface, to split interface types and numbers.
As you can see, I’ve defined one dictionary with two nested dictionaries. Here I added support for Arista and HP too. The goal should be to write something general instead of Arista specific, so we can add even more vendors.
Once we splitted our interface with _get_interface, we extract vendor information and then we use the above dictionary to normalize our interface type. After this, the fixed interface is returned.
Now, let’s try our filter:
- name: CONFIGURE PORT DESCRIPTIONS USING NEIGHBOR DATA
        eos_interface:
          name={{ item.local_interface | normalize_interface("arista") }}
          description="Connects to {{ item.neighbor_interface }} on {{ item.neighbor }}"
          connection={{ inventory_hostname }}
        with_items: neighbors.response
Results:

As I said before, we may want to make it even more general. We could choose another approach, instead of keep adding vendor dictionaries.
In fact, we can notice how most of the interface’s name are quite similar even between different vendors: for example, an interface whose name starts with et is 99.9999% an ethernet interface, regardless the vendor. So, we could also have a big dictionary like this:
interfaces = {
        'as': 'Async',
        'br': 'Bri',
        'di': 'Dialer',
        'et': 'Ethernet',
        'fa': 'FastEthernet',
        'fd': 'Fddi',
        'fo': 'FortyGigE',
        'gi': 'GigabitEthernet',
        'hs': 'Hssi',
        'lo': 'Loopback',
        'ma': 'Management',
        'mg': 'Mgmt',
        'nu': 'Null',
        'po': 'Port-Channel',
        'ro': 'Route-Aggregation',
        'se': 'Serial',
        'te': 'TenGigabitEthernet',
        'tu': 'Tunnel',
        'vl': 'Vlan',
        'vx': 'Vxlan',
    }
Anyway, we’d need to pay attention to some limit cases: for example, a 10G port is a TenGigabitEthernet for Cisco but it’s a Ten-GigabitEthernet for HP. So, we may want to work a little bit more on this 😉
So, what do you think about this? How would you make it better and more general? 🙂

Cool! Another limit case to consider is Juniper, who uses ‘ge’ for 1G and ‘xe’ for 10G and are never written out. This one may solve itself easily, being different enough to work in a dictionary. The other cases will take some tinkering, I’d start by looking for other ways to pull the desired interface name directly from the device…
LikeLike
Hey Chris, many thanks for your comment.
You’re right, at first I wanted to include Juniper as well here. Anyway, it’d needed some more work and it wasn’t my main point at that time.
Thanks also for your interesting hints! 🙂
LikeLike