Network Automation Project – Part 1

Hi everyboy, today I want to share with you a project I’ve worked on during the past days. For this project I’ve been inspired by the Facebook NetEng team who created the #netengcode facebook group after a presentation a NANOG where they performed a tutorial on Network Automation and, specifically, on how they developed an auto-remedation tool. Beside all the really interesting contents, the tool was developed using DB interaction using Python. Since I’ve never done anything like this, I’ve decided to make some practice coding a little project.

As I said, I’ve been inspired by their work and code, and my project contains some lines of theirs (limited to some db.py’s lines). Anyway, let’s start 🙂

[The whole project code can be found on GitHub, here]

SCENARIO

scenario

As usually, the network is built using GNS3 with VirtualBox.

The devices are minimally configured with the essentials to provide basic connectivity and SSH access to the user gabriele.

THE TOOL

The project directory is composed by several files:


gabriele@gabriele-VirtualBox:~/Desktop/project$ ls
bgp.py network_automation_project.py db.py push.py devices.txt interfaces.py


The network_automation_project.py file is the main file that we will be execute. An high level description of the project is:

  • The user define a list of devices to be added inside the network using the devices.txt text file.
  • The “python network_automation_project.py [-u username -p password -f textfile]” command is executed.
  • The tool will ask for any missing parameters and then will start to parse devices.txt data inside a sqlite database.
  • The tool will ask the user some facts about the network (interface names and addresses and BGP informations).
  • The tool will store those additional information inside the db.
  • The tool will generate the proper configuration based on the data provided.
  • The tool will push the configuration to the devices.

In this stage the project is executed as dry run, but I’d like to add some multithreding function.

THE DB

As I said, the db is a sqlite one. I’ve defined 3 tables: devices, interfaces and neighbors.


DEVICES_SCHEMA = (''' 
 CREATE TABLE devices ( 
 router_id TEXT PRIMARY KEY, 
 hostname TEXT, 
 vendor TEXT, 
 ports INT, 
 as_number INT, 
 ip_address TEXT, 
 configured DEFAULT 0) 
''') 
NEIGHBORS_SCHEMA = (''' 
 CREATE TABLE neighbors ( 
 router_id TEXT PRIMARY KEY, 
 neighbors_list TEXT) 
''') 
INTERFACES_SCHEMA = (''' 
 CREATE TABLE interfaces ( 
 router_id TEXT PRIMARY KEY, 
 interface TEXT) 
''') 


RUN IT!

Let’s see what happens if we run it.


..$ python network_automation_project.py -u gabriele -p projectme10 -f devices.txt
BUILDING DB
{
 "1.1.1.1": {
 "as_number": "10", 
 "hostname": "Router1", 
 "ip_address": "172.16.1.1", 
 "ports_number": "12", 
 "vendor": "Cisco"
 }, 
 "2.2.2.2": {
 "as_number": "20", 
 "hostname": "Router2", 
 "ip_address": "172.16.2.2", 
 "ports_number": "36", 
 "vendor": "Cisco"
 }
}


As you can see, I’ve executed the tool with the options -u -p -f so that it will run directly without asking any missing information first.

The devices.txt file appears as follows:


1.1.1.1;Router1;Cisco;12;10;172.16.1.1;
2.2.2.2;Router2;Cisco;36;20;172.16.2.2;

The format is router_id;hostname;vendor,number_of_ports;as_number;ip_address_to_ssh;

After that all the parameters are parsed, the tool will start building and populating the database.

If everything goes well, then we can start to configure our ports.. [CLICK IMAGES TO ENLARGE]

ports

The tool informs me I can configure up to 12 ports and ask me how many ports I whish to configure right now. I choose 2 ports and then I have to enter the information required. To make sure the user will insert a valid IP address I’ve used the netaddr Python module. All the data is then stored inside the db.

Then we enters the BGP configuration phase..

bgp

After this, the tool starts to generate the proper configuration command based on the data stored inside the db. Then, the configuration is pushed into the devices using the netmiko Python API and, lastly, all the running configuration is saved in a text file with the format hostname_configuration.txt

conf

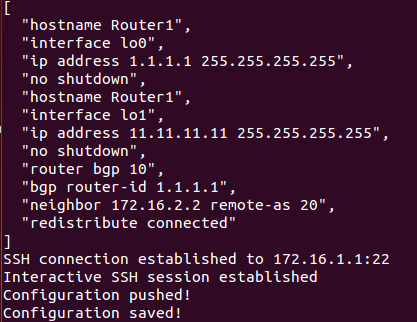
Now it’s the time to configure the other device as well.

After that, let’s verify eveything has gone fine issuing a “show bgp” command on Router2:

show_bgp

It seems good. R2 now it’s named Router2 and all the BGP information are received correctly. In addition to this, we can also examine the 2 new created text files: Router1_configuration.txt and Router2_configuration.txt.

GOING FURTHER

The project is not finished yet and I’d like to add some more functionalities and fix some problems as well. Specifically, I’d like to:

  • Improve DB interaction, since sometimes some error occurs when data is already stored.
  • Add some multivendor support, As you can see from the actual code, I’ve included some function to generate Juniper configurations, but I leaved them blank.
  • Add some multithreading behaviour.
  • Add some “service” like traffic draining.

Finding some other guy who wish to contribute would be great. So if you’re interested or if you have some hints please reach out 😀

I hope you will find this post interesting. Any comments are more than welcome 🙂

Again, the whole project code can be found here


P.S.

I’ve started contributing to other network automation project on github. I think this is a great way to learn and understand things better. By now I’ve only pushed few lines of code to the netcli_to_dict project, which is “a collection of scripts that provide samples of how to iterate through the output of an executed command and return a dictionary, or a list of dictionaries, based on information could be useful in various automation projects.

P.P.S

Few days ago I went to Taormina with my girlfriend. We spent some great time together dining and walking through the beautiful streets of that little city. Then, I saw the “I have a dream…” wall, where everyone can write something. So I decided to take the chunk and write “NETENG INTERN 2016”. Who knows.. 🙂

WP_000215

P.P.P.S

For those wondering, I’m not an a**hole and so I’ve written something romantic for my girlfriend before writing the above thing 😀

A Cisco, a Juniper, a Vyatta Router…and an Ansible Playbook

Here we are, 2.5 months are passed since I started this challenge and it’s time to do some kind of review and summary of what I’ve done during this time:

  • I’ve publised 9 blog posts (with this one being the 9th)
  • I’ve published 2 interviews with engineers from Google and Cisco (another interview is already completed and I’ll post it soon)
  • I’ve completed a Coursera’s course about Python
  • I’ve achieved the Juniper JNCIA certification
  • I’ve achieved the Vyatta BCVRE certification
  • I’ve started to study and practice network automation and Linux skills

I’m quite satisfied so far, but my last goal is still too far and I need to work harder if I want to reach it.

In regards to the list above, I decided to build a little virtual lab to make some practice (and have fun 🙂 ). Specifically, I’m going to build a network with a Cisco router, a Juniper router and a Vyatta one. Then, I’m going to automatically generate EBGP configurations for each of them using Ansible and, lastly, push them to the devices using a Python library.


ANSIBLE

Ansible is a great tool used to automate many kind of tasks, including the configuration and maintainance of IT infrastructure. It can also be used to help network engineers to simplify their day-to-day work and what we’ll see during this post is just a veeeeeery little use case. This is the first time I play with it but I’m really interested in digging deeper.

Ansible Playbook’s key components I’ve used are:

  • Roles: in my case, I’ve used only one role, router.
  • Tasks: once the role is defined, Ansible will look for any tasks to be completed.
  • Templates: a template is, basically, a model. I this case it’ll be a router configuration model.
  • Vars: Ansible will build the actual configuration based on the defined model, using some values identified as vars

I’m pretty sure that this explanation is far to be clear at this time, but you can find many useful information on the official documentation website.


LAB SCENARIO

lab

The network is built using GNS3 and its VirtuaBox integration. This network includes:

  • A Cisco router: Cisco IOS Software, 3600 Software (C3640-JK9S-M), Version 12.4(16)
  • A Juniper router: JunOS Olive 12.1R1.9 (in VirtualBox)
  • A Vyatta router: Brocade Vyatta 5415 vRouter 6.7 R9T60 (in VirtualBox)
  • A Linux machine: Ubuntu (in VirtualBox)

The devices are minimally configured, as shown here below where only the important configuration section, including interface configurations, are highlighted. In addition to this, I’ve enabled and configured SSH access for the user gabriele.

CISCO CONFIGURATION

interface FastEthernet0/0
 ip address 172.16.2.1 255.255.255.0
 duplex auto
 speed auto
!
interface FastEthernet1/0
 ip address 172.16.3.1 255.255.255.0
 duplex auto
 speed auto
!
interface FastEthernet2/0
 ip address 172.16.1.1 255.255.255.0
 duplex auto
 speed auto
!

JUNIPER CONFIGURATION

[edit]
gabriele@Router1# show interfaces
em0 {
   unit 0 {
      family inet {
         address 172.16.4.1/24;
        }
    }
}
em1 {
   unit 0 {
      family inet {
         address 172.16.3.2/24;
        }
    }
}

VYATTA CONFIGURATION

[edit]
gabriele@vyatta# show interfaces
   ethernet eth0 {
   address 172.16.2.2/24
   duplex auto
   hw-id 08:00:27:d2:5f:38
   smp_affinity auto
   speed auto
 }
   ethernet eth1 {
   address 172.16.4.2/24
   duplex auto
   hw-id 08:00:27:58:e3:1c
   smp_affinity auto
   speed auto
 }

ANSIBLE CONFIGURATION

My project’s directory tree looks like this:


gabriele@gabriele-VirtualBox:~/Desktop/BGP$ find . -type d
.
./roles
./roles/router
./roles/router/vars
./roles/router/tasks
./roles/router/templates

Inside the tasks subdirectory there is a file named main.yml


---
- name: Generate configuration files
 template: src=router_cisco.j2 dest=/home/gabriele/Desktop/BGP/{{item.hostname}}.txt
 with_items: cisco_template

- name: Generate configuration files
 template: src=router_juniper.j2 dest=/home/gabriele/Desktop/BGP/{{item.hostname}}.txt
 with_items: juniper_template

- name: Generate configuration files
 template: src=router_vyatta.j2 dest=/home/gabriele/Desktop/BGP/{{item.hostname}}.txt
 with_items: vyatta_template

The “—” pattern at the beginning of the file indicates it is a YAML file. The field called name  indicates the name of the tasks that have to be execute: generation of 3 template based on the structure of something called cisco_template, juniper_template and  vyatta_template. Where are those models?

They resides inside the template directory..


gabriele@gabriele-VirtualBox:~/Desktop/BGP/roles/router/templates$ ls
router_cisco.j2 router_juniper.j2 router_vyatta.j2


..and they appear as follows.

router_cisco.j2


configure terminal
{% for interface in cisco_loopback %}
interface {{interface.name}}
ip address {{interface.address}} {{interface.mask}}
{% endfor %}

router bgp {{item.as}}
{% for neighbor in cisco_neighbors %}
neighbor {{neighbor.id}} remote-as {{neighbor.as}}
{% endfor %}
{% for loopback in cisco_loopback %}
network {{loopback.network}} mask {{loopback.mask}}
{% endfor %}


juniper_template.j2


configure
set protocols bgp group external-peers type external
set routing-options autonomous-system {{item.as}}
{% for neighbor in juniper_neighbors %}
set protocols bgp group external-peers neighbor {{neighbor.id}} peer-as {{neighbor.as}}
{% endfor %}
{% for loopback in juniper_loopback %}
set interface lo0 unit 0 family inet address {{loopback.address}}
set policy-options prefix-list Loopback {{loopback.network}}
{% endfor %}
set policy-options policy-statement ebgp term 1 from prefix-list Loopback
set policy-options policy-statement ebgp term 1 then accept
set protocols bgp group external-peers export ebgp
commit


vyatta_template.j2


configure
set protocols bgp {{item.as}}
{% for neighbor in vyatta_neighbors %}
set protocols bgp {{item.as}} neighbor {{neighbor.id}} remote‐as {{neighbor.as}}
{% endfor %}
{% for loopback in vyatta_loopback %}
set interface loopback lo address {{loopback.address}}
set protocols bgp {{item.as}} network {{loopback.network}}
{% endfor %}
commit


These are Jinja2 files and, basically, are a set of configuration commands with something “strange” inside. In fact, all the things inside curly braces are variable that Ansible will use to build the actual models.

So, for exampe, the snippet below means that somewhere (inside the vars directory) exists an iterable called vyatta_loopback which can be looped and its values as and network are assigned to the template.


{% for loopback in vyatta_loopback %}
set interface loopback lo address {{loopback.address}}
set protocols bgp {{item.as}} network {{loopback.network}}
{% endfor %}

One last thing should be examinated: the vars directory. Anyway, in this stage it is empty. Why? Because I decided to let the user to dinamically configure it using a Python script.


BGP Script

The whole project, including the Python script can be found here.

We can choose to execute the AutomateBGP.py in 2 ways:

  • including some options like username and password to be used for the SSH connection to the devices, and a file_name containing devices’ IP addresses and platform.
  • if we execute it without including any parameters, the script will ask us to insert all the missing values.

After this, the user will be asked to insert some information about Loopback interfaces (address, network and mask), BGP AS and BGP neighbors.

screen

Now that we have all the information we needed, we can go back to the vars directory, where the script creates a new main.yml file containing all the variables needed by Ansible to build the templates.


---
cisco_template:
- { hostname: cisco_template, as: 10 }

cisco_loopback:
- { name: lo0, address: 1.1.1.1, network: 1.1.1.0, mask: 255.255.255.0 }
- { name: lo1, address: 11.11.11.11, network: 11.11.11.0, mask: 255.255.255.0 }

cisco_neighbors:
- { id: 172.16.2.2, as: 30 }
- { id: 172.16.3.2, as: 20 }

juniper_template:
- { hostname: juniper_template, as: 20 }

juniper_loopback:
- { name: 1, address: 2.2.2.2/24, network: 2.2.2.0/24 }
- { name: 2, address: 22.22.22.22/24, network: 22.22.22.0/24 }

juniper_neighbors:
- { id: 172.16.3.1, as: 10 }
- { id: 172.16.4.2, as: 30 }

vyatta_template:
- { hostname: vyatta_template, as: 30 }

vyatta_loopback:
- { name: 1, address: 3.3.3.3/24, network: 3.3.3.0/24 }

vyatta_neighbors:

- { id: 172.16.2.1, as: 10 }
- { id: 172.16.4.1, as: 20 }

The next step is to let Ansible generate all the configuration template.


os.system("ansible-playbook site.yml")

This line of code has the effect to create 3 new text files: cisco_template.txt, juniper_template.txt, vyatta_template.txt.


PLAY [Generate router configuration files] ************************************

GATHERING FACTS ***************************************************************
ok: [localhost]

TASK: [router | Generate configuration files] *********************************
changed: [localhost] => (item={'as': 10, 'hostname': 'cisco_template'})

TASK: [router | Generate configuration files] *********************************
changed: [localhost] => (item={'as': 20, 'hostname': 'juniper_template'})

TASK: [router | Generate configuration files] *********************************
changed: [localhost] => (item={'as': 30, 'hostname': 'vyatta_template'})

PLAY RECAP ********************************************************************
localhost : ok=4 changed=3 unreachable=0 failed=0

cisco_template.txt


configure terminal
interface lo0
ip address 1.1.1.1 255.255.255.0
interface lo1
ip address 11.11.11.11 255.255.255.0

router bgp 10
neighbor 172.16.2.2 remote-as 30
neighbor 172.16.3.2 remote-as 20
network 1.1.1.0 mask 255.255.255.0
network 11.11.11.0 mask 255.255.255.0

juniper_template.txt


configure
set protocols bgp group external-peers type external
set routing-options autonomous-system 20
set protocols bgp group external-peers neighbor 172.16.3.1 peer-as 10
set protocols bgp group external-peers neighbor 172.16.4.2 peer-as 30
set interface lo0 unit 0 family inet address 2.2.2.2/24
set policy-options prefix-list Loopback 2.2.2.0/24
set interface lo0 unit 0 family inet address 22.22.22.22/24
set policy-options prefix-list Loopback 22.22.22.0/24
set policy-options policy-statement ebgp term 1 from prefix-list Loopback
set policy-options policy-statement ebgp term 1 then accept
set protocols bgp group external-peers export ebgp
commit

vyatta_template.txt


configure
set protocols bgp 30
set protocols bgp 30 neighbor 172.16.2.1 remote‐as 10
set protocols bgp 30 neighbor 172.16.4.1 remote‐as 20
set interface loopback lo address 3.3.3.3/24
set protocols bgp 30 network 3.3.3.0/24
commit


PUSH IT!

One last step remains to complete the lab: pushing the configuration to the devices. I used Paramiko to do so. It is a useful Python library to interact with network devices. I’ve written a run_command() function to split each template in single commands and then pushing them. Once the configuration is completed, the script informs you about the accomplishment.


def run_commands(ip_address, user, password, commandList, platform, buffer=5000):
    """ this function runs the specified commands on the node. """
    print "Configuring " + ip_address
    remote_conn_pre = paramiko.SSHClient()
    remote_conn_pre.set_missing_host_key_policy(paramiko.AutoAddPolicy())
    remote_conn_pre.connect(ip_address, username=user, password=password)
    remote_conn = remote_conn_pre.invoke_shell()
    if platform == "cisco":
        remote_conn.send("enable\n")
        time.sleep(1)
        remote_conn.send(password+'\n')
        time.sleep(1)
    commands = commandList.split('\n')
    for com in commands:
        remote_conn.send(com+'\n')
        time.sleep(1)
        output = remote_conn.recv(buffer)

LET’S VERIFY

Now we can verify that everything has gone well (click the images to watch them larger)

Cisco

show

Juniper

show1

Vyatta

show2


CONCLUSIONS

It’s been really funny to code for this lab. If you look at the code, you’ll see it isn’t well optimized at all and it can be improved to catch exception, errors, adding use cases and so on. Anyway, my goal with this lab was to start playing with Ansible and to write some code, but it’d be too lenghty trying to optimize it at the moment.

I’m really interested in this kind of stuff so I’m always looking for new ideas to make some practice. Any kind of suggestion, tips or feedbacks are highly appreciated 🙂

Bye!

Update

Here it is a little update about my jouney.

As stated into the first post, my first milestone for this challenge will be achieving the Juniper JNCIA certification and during the past days I’ve started to study. In order to do so, I’m using several resources:

  • Junos as a Second Language-WBT: I’ve already completed this mini-course whose focus is to make easier the transition from other vendor based CLI (Cisco IOS) to Junos.
  • CBT Nuggets: Interesting video lectures held by Scott Morris discussing all the JNCIA exam objects.
  • Juniper Fast Track stuff, including a free JNCIA study guide from Juniper itself.
  • GNS3 with Olive support, in order to emulate some simple network and get used to the new configuration environment and syntaxt.

Although I’ve not yet dived deep into the subject, I think Junos has some really cool features like the separation between Control Plane and Data Plane, inner modularity with processes memory separation (so that no single fail would affect the whole system), FreeBSD based (so that it feel like working with Linux).

At the same time, I’m using this Coursera course as a refresher for my Python not-that-awesome skills.