AUTOMATE IT² (or Automate IT in ITaly)

During the last year I’ve travelled quite a lot (compared to my standards) and most of the times I did it to attend some technical/social event:

  • I attended the AnsibleFest Brooklyn 2016
  • I partecipated as delegate at my first Tech Field Day at CLEUR
  • I attended my first Cisco Live in Berlin
  • I was invited by Facebook to take part in a NetEng Hackathon in Dublin

I also joined NAPALM community for an online Hackathon (if you missed it, redeem yourself by taking part in the next one which will be held in November!) that was as fun as other live events.

Needless to say, I’ve enjoyed every single of those! Being a remote worker, it’s really important for me to attend such events as they give me the opportunity to meet some folks known online only and to share experiences and ideas.

The only drawback is that I always have to travel to other countries to attend events like these (thanks NAPALM!). Here in Italy, where I live, we either have only vendor-driven conferences or some hardcore networking communities, which are totally great but simply not the kind I’m interested on. It’s a pity! 🙂

Let’s meet(up)!

For the reason above, some months ago I started to meditate about creating an Italian-based meetup serie focused on Network Automation and all those shiny things around that. The first thing you have to do if you want to make an idea like this come to life is to share it with someone, and so I did: I spoke with my friend Andrea Dainese and it turned out he had my same idea, due to the same concern. It was perfect, so we joined our forces and we create AUTOMATE IT²,  or Automate IT in ITaly.

We’ve just published our first meeting date and we’re so excited about that. It will take place in Milan next 28th November, hosted by Palo Alto Networks and we will have some awesome national and international guests presenting there (the Call for Talks is still open and it will always be, we need your help to make this all work!)

If you’re excited about this like us and if you’ll be around Milan in November, please reserve your seat as they’re limited and come to have fun with us 🙂

Let’s meet there for some good combination of Code, Networks and Pizza 😉

We don’t care about the tool you’re using, the vendor you’re paying, the company you work for, the language you’re writing on, your gender, your experience level. We just want to hear and learn from you and with you!

Cisco Wants You to Use APIs and It Shows

As anticipated in a previous blog post, I’ve attended Cisco Live Europe in Berlin from 20th to 24th February. During that time I’ve also had the pleasure to be invited as delagate at the Tech Field Day at CLEUR event and had the opportunity to hear about some interesting news from Cisco on several topics and environments.

During the first TFD day of sessions, we learned how Cisco is developing and leveraging its DNA (Digital Network Architecture) to simplify how campus networks are managed. This post will be focused on new features around programmability and automation on enterprise switches.

Programmable Interfaces in Enterprise Switches

SDN, NFV, Automation, Softwarization, Orchestration. When software meets networks the confusion starts from the naming. There is a whole world of new tools, names and acronyms around this field that people can get lost even before starting to dig deeper into it. That’s why our presenter, Fabrizio Maccioni, decided to give us a very focused and practical view of what Cisco is doing with programmable interface in campus switches.

(In)Consistency

One of the biggest difficulties in automating multi-vendor networks is that most vendors (when they do!) offer totally different APIs and protocols to “automate” their devices. This means that in order to execute a simple operation, like getting the current running configuration, we may have to use a REST API for vendor X, simple CLI for vendor Y and some proprietary protocol for vendor Z. This operation may also return structured or un-structured data based on the vendor. This is clearly sub-optimal and it doesn’t help engineers to start automating their networks.

This is even more frustrating when it happens with different devices from the same vendor! Today, based on which Cisco equipment you have, you may end up on one of the following stages:

  • Catalyst 4K: no APIs offered. Simple SSH/screen scraping of unstrucured data
  • Catalyst 3K: NETCONF protocol with YANG models
  • Nexus 7K: NX-API leveraging CLI
  • Nexus 9K: NX-API leveraging REST

The good news is this is going to change soon. In fact, Cisco is working on driving consistency across several platforms so that we will be able to automatically manage our Cisco networks in the same regardless of the device platform and OS. In particular, Cisco will bring this kind of consistency across IOS-XR, IOS-XE and NX-OS.

This is an important commitment from Cisco as it represents the desire to lower the barrier to start using APIs instead of CLI on their enterprise equipment.

Data Models

How is Cisco going to do it?

The plan is to leverage YANG data models over device features, using NETCONF, REST or gRPC to configure/get those features.

YANG (Yet Another Next Generation) is a data modeling language used to describe how data is represented and accessed. YANG data models are represented by definition hierarchies called schema trees whose instances are encoded in XML. 

As as example, the following block represent the data model for ACL statistical data.

module cisco-acl-oper {
  yang-version 1;
  namespace "urn:cisco:params:xml:ns:yang:cisco-acl-oper";
  prefix cisco-access-control-list-oper;

  import ned {
    prefix ned;
  }
  import ietf-yang-types {
    prefix "yang";
  }

  organization
    "Cisco Systems, Inc.";

  contact
    "Cisco Systems, Inc. Customer Service Postal: 170 W Tasman Drive
     San Jose, CA 95134 Tel: +1 1800 553-NETS E-mail: cs-yang@cisco.com";

  description
    "This module contains a collection of YANG definitions for ACL statistical data."+
    "Copyright (c) 2016 by Cisco Systems, Inc."+
    "All rights reserved.";

  reference "TODO";

  revision 2016-03-30 {
    description
      "Update description with copyright notice.";
  }

  revision 2015-08-10 {
    description "Model for Network Access Control List (ACL) operational data.";
    reference
      "RFC XXXX: Network Access Control List (ACL)
      YANG Data  Model";
  }

  augment /ned:native {
    container access-lists {
      config false;
      description
        "This is top level container for Access Control Lists. It can have one
        or more Access Control List.";

      list access-list {
        key access-control-list-name;
        description "An access list (acl) is an ordered list of
        access list entries (ACE). Each access control entries has a
        list of match criteria, and a list of actions.
        Since there are several kinds of access control lists
        implemented with different attributes for
        each and different for each vendor, this
        model accommodates customizing access control lists for
        each kind and for each vendor.";

        leaf access-control-list-name {
          type string;
          description "The name of access-list. A device MAY restrict the length
        and value of this name, possibly space and special characters are not
        allowed.";
        }

        container access-list-entries {
          description "The access-list-entries container contains
          a list of access-list-entry(ACE).";

          list access-list-entry {
            key rule-name;
            ordered-by user;
            description "List of access list entries(ACE)";
            leaf rule-name {
              type uint32;
              description "Entry number.";
            }

            container access-list-entries-oper-data {
              description "Per access list entries operational data";
              leaf match-counter {
                type yang:counter64;
                description "Number of matches for an access list entry";
              }
            }
          }
        }
      }
    }
  }
}

YANG models are open and available on GitHub, where we can find a sub-directory reserved to Cisco models for IOS-XE, IOS-XR and NX-OS.

These models can either be open or native:

  • open models are vendor-independent, designed by standardization organizations like IETF but also by other entities like OpenConfig
  • native models are designed by Cisco itself for its own equipment

Cisco devices will support both types of model, with native models being a super-set of open ones. The reason for this is clear: (1) standardization organization are generally slow as (2) they have to find trade-off between several parties needing to find the best solution fitting the whole industry. As a result, platform specific features will be left out of the equation. In order to avoid partial feature coverage (which would be the worst!) Cisco has developed its native models that will be used to offer a complete support for all features. Anyway, both families will always be supported and the user will be the one who will choose which family to use. So if you want to use only IETF models across your multivendor enviroment which includes Cisco device, go for it!

This also have another implication: native models may be different across platforms, meaning that the same feature may be represented by different models on NXOS and XE, since NXOS can have some specific attributes not present on XE. This totally makes sense, but still I hope deviations will be minimal. We’ll know soon!

An important section of Fabrizio’s session has been focused on demos, showing us few use cases where these new features can be useful. Obviously, I couldn’t stand still without testing something myself 😉

Demo time

An example worths thousand  words, so we’ll use two simple scripts to compare sending CLI command over SSH and using an open programmable interface like REST, highlighting the key benefits coming with the second approach.

Here I’ll use a Cisco CSR1000V device running Cisco IOS XE Software, Version 16.03.01. Jason Edelman has highlighted how this platform already supports RESTCONF even if it still appears as an hidden feature.

Operational commands

First, I want to compare sending operational commands. I’ll use Netmiko as SSH library. The following simple script will get the show ip interface brief output and will print it out.

from netmiko import ConnectHandler

def main():
 device = ConnectHandler('csr1', username='test', password='test', device_type='cisco_ios')
 output = device.send_command('show ip interface brief')
 print output

if __name__ == "__main__":
 main()

The output will look as follows:

csr1#show ip interface brief
Interface              IP-Address      OK? Method Status                Protocol
GigabitEthernet1       10.0.0.51       YES NVRAM  up                    up
GigabitEthernet2       unassigned      YES NVRAM  up                    up
GigabitEthernet3       unassigned      YES NVRAM  up                    up
GigabitEthernet4       10.10.10.1      YES NVRAM  up                    up
Loopback10             unassigned      YES unset  up                    up

Let’s now do the same using the REST API.

import requests

def main():
    auth = HTTPBasicAuth('test', 'test')
    headers = {
        'Accept-Type': 'application/vnd.yang.data+json',
        'Content-Type': 'application/vnd.yang.data+json'
    }

    url = 'http://csr1/restconf/api/config/native/interface?deep'
    response = requests.get(url, headers=headers, auth=auth)
    print response.text

if __name__ == "__main__":
    main()

The produced output will look like this (too verbose).

Let’s compare them:

  • The first approach returned unstructured data which is easy to understand by engineers but hard to manage by software. Also, it took 8.8s to establish an SSH session, execute the command and retrieve the output. SSH is stateful, meaning a session needs to be created before starting to send any commands
  • The second approach returned A LOT of structured data which is really easy to manage and parse. Also, it took only 3.2s to get an huge amount of data because REST is a stateless service, meaning no session has to be established first

Configuration commands

Let’s now see how SSH and REST differently behave with configuration commands. I want to send a set of configuration commands to configure an interface with the following properties:

  1. name: Loopback10
  2. ip: 100.10.10.10
  3. mask: 255.255.255.255
  4. description: Configured with RESTCONF

To make things trieckier, let’s insert a typo into the mask: 255.255.255.355.

I’ve written two other simple scripts executing configuration commands via SSH and REST. In the first one, since it uses simple SSH, each command is sent individually. Let’s run it:

$ python test_ssh_command.py
$

Let’s now check what happened on the device:

csr1#show run interface loopback10
Building configuration…

Current configuration : 76 bytes
!
interface Loopback10
description Configured via REST
no ip address
end

As we can see, no IP/mask is configured due to the typo into the mask value, but the interface’s been created and description’s been correctly configured. This means this kind of operation is not transactional/atomic: in a transactional operation all operations must be correctly executed, otherwise none of them will be executed at all.

Now, let’s run the REST script, in which we can send multiple configuration commands at once (I’ve removed the loopback interface before doing it and included a print to show the request’s response).

$ python test_rest_command.py
{
  "errors": {
    "error": [
      {
        "error-message": "invalid value for: mask in /ios:native/ios:interface/ios:Loopback[ios:name='10']/ios:ip/ios:address/ios:primary/ios:mask: \"255.255.255.355\" is not a valid value.",
        "error-urlpath": "/api/config/native/interface/Loopback",
        "error-tag": "malformed-message"
      }
    ]
  }
}

Here we have a clear description of what went wrong: invalid value for: mask \”255.255.255.355\” is not a valid value.

Let’s get back to the device and see what happened.

csr1#show run interface loopback10
                                ^
% Invalid input detected at '^' marker.

The loopback interface has not been created! How come?
The RESTCONF interface pushes configuration on NETCONF datastore first. Then, if the configuration is valid, meaning all the values are compliant to the underlying data models, it’s committed to the running configuration. Otherwise, ALL the configuration operations contained in the RESTCONF/NETCONF call are rolled back and never applied!

Again, let’s compare:

  • Single operation in SSH, multiple operations at once in RESTCONF/NETCONF
  • Open interfaces are transactional, SSH is not
  • Better error handling in RESTCONF/NETCONF. We can use try/except Python construct to check and remediate errors

On-box Python

I’ve already written on on-box Python support on Nexus 9000 platform. This may be particularly useful on some use cases and Cisco is now adding this support to its enterprise switches as well!

Fabrizio’s shown us an interesting demo where he exploited the Embedded Event Manager and Python. Here he configured the EEM (1) to monitor log messages to look for an IF-DOWN message and running a Python script to reactivate it via a “no shut” command and (2) to create a backup config every time a change occour.

Someone may ask: why should we consume CPU for something we can do with an external system? Here are few points:

  • Python runs on a secure Linux instance on the device, so the actual OS is separated from Linux environment. This enabled Cisco to limit the Linux container CPU usage up to 1% of the total. This means Python scripts will never overload your device.
  • Why shouldn’t you use something that is already there without the need to add an external system which may mean additional complexity, overhead etc. ? 🙂
  • What if you accidentaly lose access to the device due to some misconfiguration on your management interface? This can be used to automatically restore the right configuration!

Conclusions

Unlike other buzzword, Automation is a reality today and it’s good to see how Cisco is working hard on trying to offer a better experience to those who want to start automating their networks, not only on data centers but on campus environments as well.

In particular, I’m really happy about Cisco effort on bringing some level of consistency across the (almost) full range of OSs. This is something the industry has to lean toward if we want automation to be the normality when it comes to operate networks: consistency across APIs, enabling us to access devices the same way and consistency on data using open models, enabling us to get the same kind of data across differen devices.

That’s the future and I’m excited about it 🙂


Cisco Live Europe 2017

Last October I was in New York City to enjoy few days of onsite work at Network to Code‘s HQ. I love working remotely from my home in Sicily, but it’s always interesting and exciting to physically join the team every once in a while. At that time, we had the opportunity to attend the Ansible Fest in Broklyn, a full day of presentations and workshops around the Ansible’s world. This one was the first important live event I’ve ever attended and I really enjoyed it as it offered the opportunity to meet new folks sharing our “automation vision” 🙂

Next month will be the time of another important event: Cisco Live Europe in Berlin. I’ve discovered the passion for networks by attending a Cisco Academy class at high school and since that moment I’ve always dreamed to attend a Cisco Live event. Now I’ll finally have the opportunity to do it!

As it’s clear, my interest around networks has evolved over time and now my focus is on Network Automation: Ansible, NAPALM, Python, APIs, CI/CD, StackStorm, you got it, this kind of magical stuff 😀 Because of this, I plan to spend most of my time at the DevNet Zone, a place where crazy people can talk about crazy stuff. Some of the session I’m interested to attend are these:

  • Getting Started with Containers: DEVNET-2042
  • Building a DevOps CICD Pipeline from Scratch: DEVNET-2203
  • Demystifying Container Networking: DEVNET-1195
  • DevNet Workshop – Managing Cisco UCS with the Python SDK: DEVNET-2060
  • DevNet Workshop – ACI API: DEVNET-2054
  • Cisco UCS Python SDKs: DEVNET-2063
  • NetDevOps for the Network Dude – How to get started with API’s, Ansible and Python: DEVNET-1002
  • Mastering ACI Programmability and Automating common DC Tasks: DEVNET-2001
  • DevNet Workshop – NXOS in the Real World Using NX-API REST: DEVNET-2101
  • DevNet Workshop – NETCONF/RESTCONF/YANG API: DEVNET-2044
  • DevNet Workshop -Device programmability for zero touch provisioning: DEVNET-2053

Yeah, that’s lot of content, I’ll need to diligently plan ahead for it. That said, I’m sure it’ll be an amazing experience!

I’ll arrive in Berlin on February 20, so if you’d like to meet and talk about everything around networking and automation I’d be very happy to share a beer with you, so just reach out! 🙂


Telemetry Streaming on Cisco IOS-XR, NXOS and Slack

As we all know, Network Automation is getting more and more real in today networks and communities. All vendors now offer some programmable interface to their products, enabling network engineers to better configure and manage their infrastructures. Automation inspired communities like Network-to-Code Slack channel now counts 1300+ professionals who exchange knowledge and help each other on a day-to-day basis. Remarkable Python automation libraries are expanding and improving at a very good pace (netmiko, NAPALM) as well as existing tools and frameworks like Ansible have lately added a bunch of new networking related features and networking Hackthons are organized.

All of these are very good signals that should push you to embrace the change, if you haven’t done it yet 🙂 This change is so big that it not only involves devices configuration (unlike many people think when they first meet automation) but it affects the whole network life cycle, from the design to the configuration, to the maintenance and monitoring.

I underlined monitoring as it is a big topic and some vendor like Cisco has started to support a set of ways to let you be able to dynamically gather data and statistics from devices.

Streaming Telemetry

The last sentence may sounds familiar to you (SNMP anyone?) but Telemetry is a totally different concept. The whole idea of Telemetry is based on a push model, where the device sends data to a configured receiver. This can be done on a timer basis or on an policy/event-driven basis. That’s pretty different from the pull model used by SNMP.

Data gained from Telemetry can be used to automatically re-configure the device, to build statistics of some given metrics, to rise preventive alarms or to whatever else use case you want to develop.

Cisco offers these capabilities to its IOS-XR (from Release 6.1.1 onwards) in two different models:

  • Model Driven Telemetry (MDT):  here the streamed data is defined by a YANG model, either an Open-Config or Cisco IOSXR native model. In order to use MDT the device must support
  • Policy Driven Telemtry (PDT):  here the streamed data is defined by policy file which also defines the frequency of the streaming. An example of policy file to stream interface counters looks like this:
{
"Name": "TelemetryTest",
 "Metadata": {
     "Version": 25,
     "Description": "This is a sample policy to demonstrate the syntax",
     "Comment": "This is the first draft",
     "Identifier": "<data that may be sent by the encoder to the mgmt stn"
},
 "CollectionGroups": {
     "FirstGroup": {
         "Period": 10,
         "Paths": [
             "RootOper.Interfaces.Interface(*)"
         ]
     }
 }
}

Testing MDT on XR

I’m really interested in this topic so I wanted to do a really quick test. Luckily, Cisco offers some nice tutorials like this.

This is what I configured on my XR device:

RP/0/RP0/CPU0:xrv1(config)# telemetry model-driven
RP/0/RP0/CPU0:xrv1(config-model-driven)# destination-group jumphost
RP/0/RP0/CPU0:xrv1(config-model-driven-dest)# address family ipv4 10.0.0.5 port 5555
RP/0/RP0/CPU0:xrv1(config-model-driven-dest-addr)# encoding self-describing-gpb
RP/0/RP0/CPU0:xrv1(config-model-driven-dest-addr)# protocol tcp
RP/0/RP0/CPU0:xrv1(config-model-driven-dest-addr)# exit
RP/0/RP0/CPU0:xrv1(config-model-driven)#
RP/0/RP0/CPU0:xrv1(config-model-driven)#sensor-group SGroup1
RP/0/RP0/CPU0:xrv1(config-model-driven-snsr-grp)# sensor-path Cisco-IOS-XR-infra-statsd-oper:infra-statistics/interfaces/interface/latest/generic-counters
RP/0/RP0/CPU0:xrv1(config-model-driven-snsr-grp)# exit
RP/0/RP0/CPU0:xrv1(config-model-driven)#
RP/0/RP0/CPU0:xrv1(config-model-driven)#subscription Sub1
RP/0/RP0/CPU0:xrv1(config-model-driven-subs)#sensor-group-id SGroup1 sample-interval 10000
RP/0/RP0/CPU0:xrv1(config-model-driven-subs)#destination-id jumphost
RP/0/RP0/CPU0:xrv1(config-model-driven-snsr-grp)# commit

This instructs the device to collect data based on a YANG model extracting interface counters. The next step is to enable the data collector on the receiver device. You can download the Collector repo from GitHub and pick the one compatible to your configured encoding method. It’s just a piece of Python code, so all you have to do is run it on your console specifying receiving address and port.

$ python telemetry_receiver.py --ip-address 10.0.0.5 --port 5555

Compiled cisco.proto
Waiting for TCP connection
Waiting for UDP message
Got TCP connection
Getting TCP message
  Message Type: JSON (2))
  Flags: None
  Length: 10695
Decoding message

CollectionStartTime: Mon Nov 14 06:07:39 2016 (393ms)
CollectionID: 1151
CollectionEndTime: Mon Nov 14 06:07:39 2016 (742ms)
Version: 25
Policy: TelemetryTest
Path: RootOper.Interfaces.Interface
Identifier: <data that may be sent by the encoder to the mgmt stn
Data: {
  RootOper {
    Interfaces {
      Interface (5 items - displaying first entry only) [
        [0]
          InterfaceName: GigabitEthernet0/0/0/0
          InterfaceHandle: GigabitEthernet0/0/0/0
          IsL2Looped: False
          EncapsulationTypeString: ARPA
          HardwareTypeString: GigabitEthernet
          State: IM_STATE_ADMINDOWN
          LastStateTransitionTime: 6644
          MaxBandwidth: 1000000
          InFlowControl: IM_ATTR_FLOW_CONTROL_OFF
          LineState: IM_STATE_ADMINDOWN
          LinkType: IM_ATTR_LINK_TYPE_FORCE
          CollectionTime: Mon Nov 14 06:07:39 2016 (544ms)
          Description:
          DataRates {
            PeakInputDataRate: 0
            LoadInterval: 9
            InputPacketRate: 0
            PeakOutputDataRate: 0
            InputLoad: 0
            PeakOutputPacketRate: 0
            OutputPacketRate: 0
            OutputLoad: 0
            Bandwidth: 1000000
            Reliability: 255
            PeakInputPacketRate: 0
            InputDataRate: 0
            OutputDataRate: 0
          }
          InterfaceType: IFT_GETHERNET
          CarrierDelay {
            CarrierDelayUp: 10
            CarrierDelayDown: 0
          }
          StateTransitionCount: 0
          IsL2TransportEnabled: False
          Encapsulation: ether
          ParentInterfaceName: <No interface>
          IsDampeningEnabled: False
          Duplexity: IM_ATTR_DUPLEX_FULL
          MediaType: IM_ATTR_MEDIA_OTHER
          MTU: 1514
          MACAddress {
            Address: 2cc2.605c.9017
          }
          BurnedInAddress {
            Address: 2cc2.605c.9017
          }
          Bandwidth: 1000000
          OutFlowControl: IM_ATTR_FLOW_CONTROL_OFF
          IfIndex: 0
          InterfaceStatistics {
            StatsType: Full
            FullInterfaceStats {
              InputOverruns: 0
              ParityPacketsReceived: 0
              MulticastPacketsSent: 0
              MulticastPacketsReceived: 0
              InputIgnoredPackets: 0
              SecondsSinceLastClearCounters: 0
              Applique: 0
              SecondsSincePacketSent: 4294967295
              PacketsSent: 0
              OutputBuffersSwappedOut: 0
              GiantPacketsReceived: 0
              SecondsSincePacketReceived: 4294967295
              InputErrors: 0
              BytesReceived: 0
              LastDiscontinuityTime: 1479115826
              OutputErrors: 0
              CarrierTransitions: 0
              LastDataTime: 1479121659
              CRCErrors: 0
              OutputDrops: 0
              PacketsReceived: 0
              InputQueueDrops: 0
              OutputQueueDrops: 0
              InputAborts: 0
              InputDrops: 0
              ThrottledPacketsReceived: 0
              Resets: 0
              FramingErrorsReceived: 0
              BroadcastPacketsSent: 0
              OutputUnderruns: 0
              OutputBufferFailures: 0
              BytesSent: 0
              RuntPacketsReceived: 0
              UnknownProtocolPacketsReceived: 0
              BroadcastPacketsReceived: 0
              AvailabilityFlag: 0
            }
          }
          Speed: 1000000
      ]
    }
  }
Getting TCP message
  Message Type: JSON (2))
  Flags: None
  Length: 8323

This was pretty easy! Here you can find the list of all YANG model you can use to get data from the device.

For example, to get BGP data you’d use sensor-path like Cisco-IOS-XR-ipv4-bgp-oper:bgp/config-instances/config-instance/config-instance-default-vrf, resulting in a stream of data like this (and much more):

Getting TCP message
  Message Type: GPB_KEY_VALUE (4))
  Flags: None
  Length: 7013
Decoding message

Collection ID:   12
Base Path:       Cisco-IOS-XR-ipv4-bgp-oper:bgp/config-instances/config-instance/config-instance-default-vrf/entity-configurations/entity-configuration
Subscription ID:
Model Version:
Start Time:      Mon Nov 14 06:40:33 2016 (606ms)
Msg Timestamp:   Mon Nov 14 06:40:33 2016 (606ms)
End Time:      Mon Nov 14 06:40:33 2016 (632ms)
Fields: 1
  Displaying first entry only
  <no name>: fields (items 31) Mon Nov 14 06:40:33 2016 (624ms) {
    instance-name: default (string)
    entity-type: 3 (sint32)
    neighbor-address: 1.1.1.1 (string)
    neighbor-address: fields (items 2)  {
      afi: ipv4 (string)
      ipv4-address: 1.1.1.1 (string)
    }
    group-name:  (string)
    configuration-type: neighbor (string)
    address-family-identifier: 23 (uint32)
    af-independent-config: fields (items 120)  {
      remote-as-number-xx: 0 (uint32)
      remote-as-number-yy: 65534 (uint32)
      configured-speaker-id: 0 (uint32)
      tcp-mss: 0 (uint32)
      min-advertisement-interval: 0 (uint32)
      min-advertisement-interval-msecs: 0 (uint32)
      description:  (string)
      ebgp-hop-count: 1 (uint32)
      bmp-servers: 1 (uint32)
      is-ebgp-multihop-bgpmpls-forwarding-disabled: false (string)
      keychain:  (string)
      local-as-number-xx: 0 (uint32)
      local-as-number-yy: 0 (uint32)
      local-as-no-prepend: false (string)
      password:  (string)
      socket-buffer-receive-size: 32768 (uint32)
      bgp-buffer-receive-size: 4096 (uint32)
      socket-buffer-send-size: 24576 (uint32)
      bgp-buffer-send-size: 4096 (uint32)
      adminstrative-shutdown: false (string)
      keepalive-interval: 60 (uint32)
      hold-time-value: 180 (uint32)
      min-acc-hold-time-value: 3 (uint32)
      local-ip-address: fields (items 2)  {
        afi: ipv4 (string)
        ipv4-address: 0.0.0.0 (string)
      }
      msg-log-in-buf-count: 0 (uint32)
      msg-log-out-buf-count: 0 (uint32)
      route-updates-source:  (string)
      dmz-link-bandwidth: 0 (uint32)
      ebgp-recv-dmz: 0 (uint32)
      ebgp-send-dmz-mode: bgp-ebgp-send-dmz-disable (string)
      ttl-security: 0 (uint32)
      suppress4-byte-as: 0 (uint32)
      capability-negotiation-suppressed: 0 (uint32)
      session-open-mode: bgp-tcp-mode-type-either (string)
      bfd: 0 (uint32)
      bfd-mininterval: 0 (uint32)
      bfd-multiplier: 0 (uint32)
      tos-type-info: 0 (uint32)
      tos-value-info: 6 (uint32)
      nsr-disabled: 0 (uint32)
      graceful-restart-disabled: 0 (uint32)
      nbr-restart-time: 120 (uint32)
      nbr-stale-path-time: 360 (uint32)
      nbr-enforce-first-as-status: true (string)
      nbr-cluster-id-type-info: 0 (uint32)
      nbr-cluster-id-info: 0 (uint32)
      ignore-connected-check: false (string)
      internal-vpn-client: false (string)
      addpath-send-capability: 0 (uint32)
      update-error-handling-no-reset: 0 (uint32)
      addpath-receive-capability: 0 (uint32)
      egress-peer-engineering: 0 (uint32)
      prefix-validation-disable: 0 (uint32)
      bestpath-use-origin-as-validity: 0 (uint32)
      prefix-validation-allow-invalid: 0 (uint32)
      prefix-validation-signal-ibgp: 0 (uint32)
      neighbor-update-filter-exists: false (string)
      neighbor-update-filter-message-buffer-count: 0 (uint32)
      neighbor-update-filter-message-buffer-is-non-circular: false (string)
      neighbor-update-filter-logging-disable: false (string)
      neighbor-update-filter-attribute-filter-group-name:  (string)
      graceful-shutdown-exists: 0 (uint32)
      graceful-shutdown-loc-pref: 0 (uint32)
      graceful-shutdown-as-prepends: 0 (uint32)
      graceful-shutdown-activate: 0 (uint32)
      remote-as-info: fields (items 2)  {
        is-item-configured: true (string)
      }
      speaker-id-info: fields (items 2)  {
        is-item-configured: false (string)
      }
      min-advertisement-info: fields (items 2)  {
        is-item-configured: false (string)
      }
      description-info: fields (items 2)  {
        is-item-configured: false (string)
      }
      ebgp-hop-count-info: fields (items 2)  {
        is-item-configured: false (string)
      }
      tcpmss-info: fields (items 2)  {
        is-item-configured: false (string)
      }
      bmp-servers-info: fields (items 2)  {
        is-item-configured: false (string)
      }
      keychain-info: fields (items 2)  {
        is-item-configured: false (string)
      }
      local-as-info: fields (items 2)  {
        is-item-configured: false (string)
      }
      password-info: fields (items 2)  {
        is-item-configured: false (string)
      }
      receive-buffer-info: fields (items 2)  {
        is-item-configured: false (string)
      }
      send-buffer-info: fields (items 2)  {
        is-item-configured: false (string)
      }
      shutdown-info: fields (items 2)  {
        is-item-configured: false (string)
      }
      timers-info: fields (items 2)  {
        is-item-configured: false (string)
      }
      local-address-info: fields (items 2)  {
        is-item-configured: false (string)
      }
      msg-log-in-info: fields (items 2)  {
        is-item-configured: false (string)
      }
      msg-log-out-info: fields (items 2)  {
        is-item-configured: false (string)
      }
      update-source-info: fields (items 2)  {
        is-item-configured: false (string)
      }
      dmz-link-bandwidth-info: fields (items 2)  {
        is-item-configured: false (string)
      }
      ebgp-recv-dmz-info: fields (items 2)  {
        is-item-configured: false (string)
      }
      ebgp-send-dmz-info: fields (items 2)  {
        is-item-configured: false (string)
      }
      ttl-security-info: fields (items 2)  {
        is-item-configured: false (string)
      }
      suppress4-bbyte-as-info: fields (items 2)  {
        is-item-configured: false (string)
      }
      session-open-mode-info: fields (items 2)  {
        is-item-configured: false (string)
      }
      bfd-info: fields (items 2)  {
        is-item-configured: false (string)
      }
      bfd-mininterval-info: fields (items 2)  {
        is-item-configured: false (string)
      }
      bfd-multiplier-info: fields (items 2)  {
        is-item-configured: false (string)
      }
      tos-info: fields (items 2)  {
        is-item-configured: false (string)
      }
      nsr-disabled-info: fields (items 2)  {
        is-item-configured: false (string)
      }
      graceful-restart-disabled-info: fields (items 2)  {
        is-item-configured: false (string)
      }
      nbr-restart-time-info: fields (items 2)  {
        is-item-configured: false (string)
      }
      nbr-stale-path-time-info: fields (items 2)  {
        is-item-configured: false (string)
      }
      nbr-enforce-first-as-info: fields (items 2)  {
        is-item-configured: false (string)
      }
      cluster-id-info: fields (items 2)  {
        is-item-configured: false (string)
      }
      ignore-connected-info: fields (items 2)  {
        is-item-configured: false (string)
      }
      internal-vpn-client-info: fields (items 2)  {
        is-item-configured: false (string)
      }
      addpath-send-capability-info: fields (items 2)  {
        is-item-configured: false (string)
      }
      addpath-receive-capability-info: fields (items 2)  {
        is-item-configured: false (string)
      }
      egress-peer-engineering-info: fields (items 2)  {
        is-item-configured: false (string)
      }
      update-error-handling-no-reset-info: fields (items 2)  {
        is-item-configured: false (string)
      }
      prefix-validation-disable-info: fields (items 2)  {
        is-item-configured: false (string)
      }
      prefix-validation-use-validit-info: fields (items 2)  {
        is-item-configured: false (string)
      }
      prefix-validation-allow-invalid-info: fields (items 2)  {
        is-item-configured: false (string)
      }
      prefix-validation-signal-ibgp-info: fields (items 2)  {
        is-item-configured: false (string)
      }
      neighbor-update-filter-exists-info: fields (items 2)  {
        is-item-configured: false (string)
      }
      neighbor-update-filter-message-buffer-count-info: fields (items 2)  {
        is-item-configured: false (string)
      }
      neighbor-update-filter-syslog-disable-info: fields (items 2)  {
        is-item-configured: false (string)
      }
      neighbor-update-filter-attribute-info: fields (items 2)  {
        is-item-configured: false (string)
      }
      graceful-shutdown-info: fields (items 2)  {
        is-item-configured: false (string)
      }
      graceful-shutdown-loc-pref-info: fields (items 2)  {
        is-item-configured: false (string)
      }
      graceful-shutdown-as-prepends-info: fields (items 2)  {
        is-item-configured: false (string)
      }
      graceful-shutdown-activate-info: fields (items 2)  {
        is-item-configured: false (string)
      }
      capability-negotiation-suppressed-info: fields (items 2)  {
        is-item-configured: false (string)
      }
      local-as-replace-as: false (string)
      local-as-dual-as: false (string)
    }
  }

You can now start to collect and consume this data as you wish. One option is to use the ready-to-use stack built by Cisco.

Pretty cool. That’s a shame we can use such technology only with a limited set of Cisco IOS-XR devices, right? 🙂

Streaming Telemetry on NXOS

On one hand, it’s totally true that this is still a poorly supported feature, but if you’re geek enough you can easily obtain some kind of push based telemetry on NXOS too. This can be done thanks to on-box Python support on Cisco NXOS 9000.

Cisco Python Package

You can easily access the on-box Python Interpreter by simply typing python. Then you can import the library to interact with the underlying OS.

n9k2# python
Python 2.7.5 (default, Oct  8 2013, 23:59:43)
[GCC 4.6.3] on linux2
Type "help", "copyright", "credits" or "license" for more information.
>>> from cli import *
>>>

Now try to send a command and display its output:

>>> vlans = cli('show vlan')
>>> print vlans 

VLAN Name                             Status    Ports
---- -------------------------------- --------- -------------------------------
1    default                          active    Eth1/1, Eth1/2, Eth1/3, Eth1/4
                                                Eth1/5, Eth1/6, Eth1/7, Eth1/8
                                                Eth1/9, Eth1/10, Eth1/11
                                                Eth1/13, Eth1/14, Eth1/15
                                                Eth1/16, Eth1/17, Eth1/18
                                                Eth1/19, Eth1/20, Eth1/21
                                                Eth1/22, Eth1/23, Eth1/24
                                                Eth1/25, Eth1/26, Eth1/27
                                                Eth1/28, Eth1/29, Eth1/30
                                                Eth1/34, Eth1/35, Eth1/36
                                                Eth1/37, Eth1/38, Eth1/39
                                                Eth1/40, Eth1/41, Eth1/42
                                                Eth1/43, Eth1/44, Eth1/45
                                                Eth1/46, Eth1/47, Eth1/48
                                                Eth2/5, Eth2/6, Eth2/7, Eth2/8
                                                Eth2/9, Eth2/10, Eth2/11
                                                Eth2/12
20   VLAN0020                         active
122  VLAN0122                         active
123  VLAN0123                         active
200  WEB                              act/lshut
201  VLAN0201                         act/lshut

VLAN Type         Vlan-mode
---- -----        ----------
1    enet         CE
20   enet         CE
122  enet         CE
123  enet         CE
200  enet         CE
201  enet         CE

Remote SPAN VLANs
-------------------------------------------------------------------------------

Primary  Secondary  Type             Ports
-------  ---------  ---------------  -------------------------------------------

We can also deal with structured output using the clid function.

>>> vlans = clid('show vlan')
>>> print vlans
{"TABLE_vlanbrief": {"ROW_vlanbrief": [{"vlanshowbr-vlanid": "1", "vlanshowbr-vlanid-utf": "1", "vlanshowbr-vlanname": "default", "vlanshowbr-vlanstate": "active", "vlanshowbr-shutstate": "noshutdown", "vlanshowplist-ifidx": "Ethernet1/1-11,Ethernet1/13-30,Ethernet1/34-48,Ethernet2/5-12"}, {"vlanshowbr-vlanid": "20", "vlanshowbr-vlanid-utf": "20", "vlanshowbr-vlanname": "VLAN0020", "vlanshowbr-vlanstate": "active", "vlanshowbr-shutstate": "noshutdown"}, {"vlanshowbr-vlanid": "122", "vlanshowbr-vlanid-utf": "122", "vlanshowbr-vlanname": "VLAN0122", "vlanshowbr-vlanstate": "active", "vlanshowbr-shutstate": "noshutdown"}, {"vlanshowbr-vlanid": "123", "vlanshowbr-vlanid-utf": "123", "vlanshowbr-vlanname": "VLAN0123", "vlanshowbr-vlanstate": "active", "vlanshowbr-shutstate": "noshutdown"}, {"vlanshowbr-vlanid": "200", "vlanshowbr-vlanid-utf": "200", "vlanshowbr-vlanname": "WEB", "vlanshowbr-vlanstate": "active", "vlanshowbr-shutstate": "shutdown"}, {"vlanshowbr-vlanid": "201", "vlanshowbr-vlanid-utf": "201", "vlanshowbr-vlanname": "VLAN0201", "vlanshowbr-vlanstate": "active", "vlanshowbr-shutstate": "shutdown"}]}, "TABLE_mtuinfo": {"ROW_mtuinfo": [{"vlanshowinfo-vlanid": "1", "vlanshowinfo-media-type": "enet", "vlanshowinfo-vlanmode": "ce-vlan"}, {"vlanshowinfo-vlanid": "20", "vlanshowinfo-media-type": "enet", "vlanshowinfo-vlanmode": "ce-vlan"}, {"vlanshowinfo-vlanid": "122", "vlanshowinfo-media-type": "enet", "vlanshowinfo-vlanmode": "ce-vlan"}, {"vlanshowinfo-vlanid": "123", "vlanshowinfo-media-type": "enet", "vlanshowinfo-vlanmode": "ce-vlan"}, {"vlanshowinfo-vlanid": "200", "vlanshowinfo-media-type": "enet", "vlanshowinfo-vlanmode": "ce-vlan"}, {"vlanshowinfo-vlanid": "201", "vlanshowinfo-media-type": "enet", "vlanshowinfo-vlanmode": "ce-vlan"}]}}

The really nice thing is that we can also run Python scripts!

So, the goal is to write a Python script to collect some data and to push them off-box to an external collector 🙂 This can be done by running the script, store the data on a file and copy it to the external collector. Doing so, we’d obtain almost the same results of XR Telemetry.

But, what if we want to make it even more cool? Let’s say writing a script to collect BGP neighbors every 30 seconds and push an alert every time the state of any neighbor changes? What if this alert is pushed to Slack instead of a server? Okay, let’s do it 🙂

Enable Slack WebHook

In order to push automatic notifications to Slack, we need to enable a WebHook which is a way to post messages as HTTP requests with a JSON payload. To configure a webhook you should go to [your company].slack.com/services/new/incoming-webhook and click on Add Incoming WebHooks Integration button. Once you have your WebHook link, you can use it with Python requests library to POST messages on channels.

A simple function to push such messages would look like this:

def message_deliver(text):
    webhook_url = # WEBHOOK URL
    username = "gabriele"
    icon_emoji = ":panda_face:"
    channel = "general"

    body = {
        'username': username,
        'icon_emoji': icon_emoji,
        'text': 'Hello World!',
        'channel': channel
    }

    command = '''
    curl -i -k -H "Content-Type: application/x-www-form-urlencoded" -X POST <webhook_url> --data '{0}'
    '''.format(str(body).replace("'", '"'))
    os.system(command)

The above function will push an Hello World! message to my WebHook, resulting in a message post by the username gabriele on the channel called general. We’ll use this exact function to push our automatic BGP notifications.

Get BGP neighbors

Writing such script is pretty easy and you can achieve it in many ways. You can find here the one I used for this test. This will gather and store all BGP neighbors and their states every 30 seconds, compare the current state with the latest one and finally push a message to Slack if any change is found.

NXOS Scheduler

Now, as last step, we have to configure a scheduler to run the Python script. This is how my scheduler looks.

n9k2# show scheduler config
config terminal
  feature scheduler
  scheduler logfile size 16
end

config terminal
 scheduler job name get_bgp_neighbors
python bootflash:/get_bgp_neighbors.py

end

config terminal
  scheduler schedule name get_bgp_neighbors
    time start 2016:11:01:13:41 repeat 5
    job name get_bgp_neighbors
end

Testing it

I’ve established a BGP session between two N9K switches. Once everything is set, we can simply shut one neighbor down resulting in this.

bot

Nice, right?

Even without XR capabilities, you can build something nice by exploiting Python and Cisco libraries!

Conclusions

I’ve touched many topics on this post: from Telemetry to Even-Driven automation, to WebHooks and on-box Python. I think all these can be useful when it comes to manage/tests a network/service and I hope this will help to get you started with such tools and technologies 🙂


Network Automation Survey

In order to better understand how people and companies are using these technology on their networks, a group of professionals has put together a survey to get a bigger picture about how we automate (or, at least, attempt to  ) our networks. Here it is if you want to partecipate.

Dream big, fail big: Network Engineering Internship @Google

If you’ve read something about me here you should know why I started this blog. I had (and still have) a big dream: obtaining an interesting Network Engineering internship at a cool company.

In order to commit myself to this goal, I decided to program my path toward it into a 10 months plan. When you do this kind of commitment you should also take into account the possibility of a fail. Then, if you decide to make your effort public opening a blog, your fail may become even bigger 🙂

That’s OK. That’s part of the game and today I’m gonna share something about this.

Google

It’s not a secret that Google is one of the best place to work for and everyone want to be part of it.

Being a Network Engineer Intern at Google would mean working on one of the biggest and most advanced networks of the world, with cool peers and surrounded by tons of interesting opportunities and projects. Awesome!

That’s why I started to think about it 🙂

Application

I’m lucky enough to have a friend and mentor who works at Google as Network Engineer and I asked him to let me know if something would have appeared on his radar. Then, one day an opportunity appeared: it was a NetOps internship position in Europe and it seemed exactly what I was looking for.

He referred me and few days later I got an email from a recruiter who kindly asked me about my background and availability for a couple of technical interviews.

Interviews preparation

I knew that Google would have asked a mix of Networking and Coding questions, so I had to focus on both during my preparation.

In summary, I did the following:

I was pretty satisfied from this preparation process but I still thought to not be enough prepared. After all, it was Google 🙂

Technical interviews

I had 2 technical interviews on the same day, lasting around 45 minutes each.

I cannot talk a lot about them but I can say one thing: F*ck Yeah! 🙂 : both interviews went great and I really enjoyed them. My interviewers were very kind and succeeded in making me feel comfortable even if I was scared and stressed like never before. All the questions were interesting and smart: they were unconventional and forced me to think about each of them. Interviewers didn’t want only to know your knowledge level but they’re more interested about how you think about problems.

So, for example, they can start asking you about BGP and then moving to some interesting scenario where you need to optimize the whole picture. You have to ask questions and consider everything. I really like this approach and, again, I really enjoyed them to the point that I was a little bit disappointed because they didn’t last longer 🙂

Around a month later I received an email from my kind recruiter who informed me that I passed that step and now only a last one remained: a short interview with the manager of the team where the intern would have worked.

Manager interview

Here I was as scared as the first time, knowing how important was this last step. But once again my interviewer was so kind and I immediately felt more calm.

This time no technical questions were expected. He only wanted to know something more about my background and describe the project. The latter, anyway, was the issue here: during all the process I thought that the intern would have been employed in a NetOps team, working on some automation project with, of course, a focus on Networking. Anyway, I was wrong. The team was a Network Acquisition one and the focus of the project would have been on some cost analysis to scale networks: data mining and data analysis skills were expected and that was the thing that killed me (from a candidate point of view 🙂 )

A week later (yesterday) I received a call from my recruiter who said me the expected results: the manager has found a better match than myself.

Final thoughts

Sometimes good things fall apart so better things can fall together

Even if I failed, I feel really happy to had the opportunity to go deep in the process and performing well during all my interviews. At least, I know that all the time spent on this project is not wasted at all.

The good thing is that I have also another opportunity with another cool company which would let me work on pretty awesome projects 😉 I’ll share more details on this if it will become a real thing as I badly hope so!

As a last thing, I want to share with you this motivational video 🙂

Get up and don’t ever give up!

[Special thanks to my friend Jakub who has always supported me. Thanks dude!]

How to Write an Ansible Filter – Dynamically Configuring Interface Descriptions in a Multivendor Environment

[Special thanks to Jason Edelman for his kind help and support during all the stages of this article. I’d have not written this without his precious suggestions and hints!]

It’s been a while since my last post. I’ve been really busy lately with work, study and other projects and I have not found the time to write something here, even if I wanted to post this article at least one month ago. Anyway, welcome back to me 🙂


Back to the start of December, Jason Edelman published another awesome blog post on Network Automation and Ansible. There he wrote an Ansible playbook to:

  1. Discover the device using snmp_device_version from Patrick Ogenstad.
  2. Discover the LLDP neighbors of the device using ntc-ansible.
  3. Configure the interface descriptions using the nxos_interface Ansible module.

This is pretty damn cool! Here you can see the whole magic playbook:

---

  - name: AUTO CONFIGURE PORT DESCRIPTIONS
    hosts: cisco
    gather_facts: no
    connection: local

    tasks:

      - name: GET SNMP DISCOVERY INFORMATION
        snmp_device_version: host={{ inventory_hostname }} community=networktocode version=2c
        tags:
          - snmp
          - neighbors

      - name: GET LLDP NEIGHBORS
        ntc_show_command:
          connection=ssh
          platform={{ ansible_device_vendor }}_{{ ansible_device_os }}
          template_dir='/home/ntc/library/ntc-ansible/ntc_templates'
          command='show lldp neighbors'
          host={{ inventory_hostname }}
          username={{ un }}
          password={{ pwd }}
        register: neighbors
        tags: neighbors

      - name: CONFIGURE PORT DESCRIPTIONS USING NEIGHBOR DATA
        nxos_interface:
          interface={{ item.local_interface  }}
          description="Connects to {{ item.neighbor_interface }} on {{ item.neighbor }}"
          host={{ inventory_hostname }}
          username={{ un }}
          password={{ pwd}}
        with_items: neighbors.response

If you run this, you’ll see Ansible dynamically configuring your Nexus interfaces. How cool is this? 🙂

It’s that cool that I wanted to try it in a multivendor environment, adding a couple of Arista switches. So I did, and this is the playbook I used:


---
 - name: Auto-configure port descriptions
   hosts: all
   gather_facts: no
   connection: local

   tasks:
     - name: GET SNMP DISCOVERY INFORMATION
       snmp_device_version: host={{ inventory_hostname }} community=networktocode version=2c

     - name: GET NEIGHBOR INFORMATION
       ntc_show_command:
         connection=ssh
         platform={{ ansible_device_vendor }}_{{ ansible_device_os }}
         template_dir='./ntc_templates'
         command='show lldp neighbors'
         host={{ inventory_hostname }}
         username={{ un }}
         password={{ pwd }}
       register: neighbors

     - name: AUTO-CONFIGURE PORT DESCRIPTIONS FOR ARISTA
       eos_interface:
         name={{ item.local_interface }}
         description="Connects to {{ item.neighbor_interface }} on {{ item.neighbor }}"
         connection={{ inventory_hostname }}
       with_items: neighbors.response
       when: type == "arista"

     - name: AUTO-CONFIGURE PORT DESCRIPTIONS FOR CISCO
       nxos_interface:
         interface={{ item.local_interface }}
         description="Connects to {{ item.neighbor_interface }} on {{ item.neighbor }}"
         host={{ inventory_hostname }}
         username={{ un }}
         password={{ pwd}}
       with_items: neighbors.response
       when: type == "cisco"

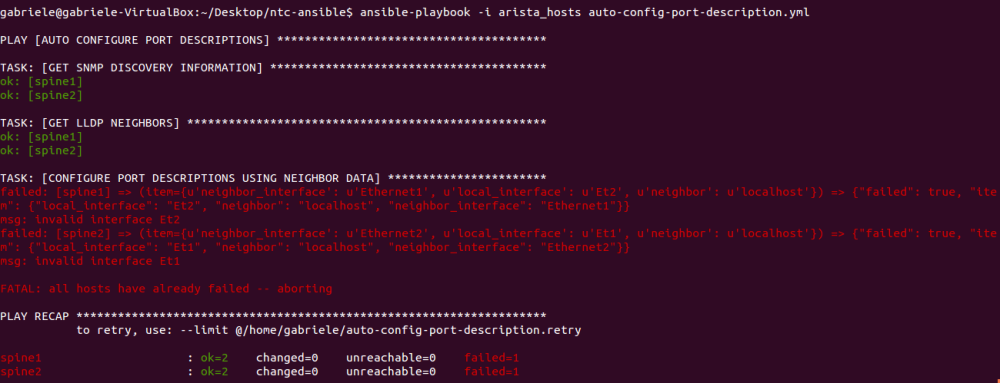
The only difference, compared to the one from Jason, is the additional task to support Arista EOS and the when conditional to select the correct task based on vendor type. Anyway, when I run this, it didn’t work at all and below you can see the error it returns!

Let’s try to understand why focusing only on Arista now.


fail

Why did it fail? The reason is pretty explicit if we read the error message from Ansible:

  • msg: invalid interface Et1
  • msg: invalid interface Et2

The problem is that Arista interfaces need to be entered using their full name. Neither Et or Eth are accepted and so the playbook fails as soon as it tries to access interface to configure descriptions.

Where do Et1 and Et2 come from? Let’s investigate a little bit more.

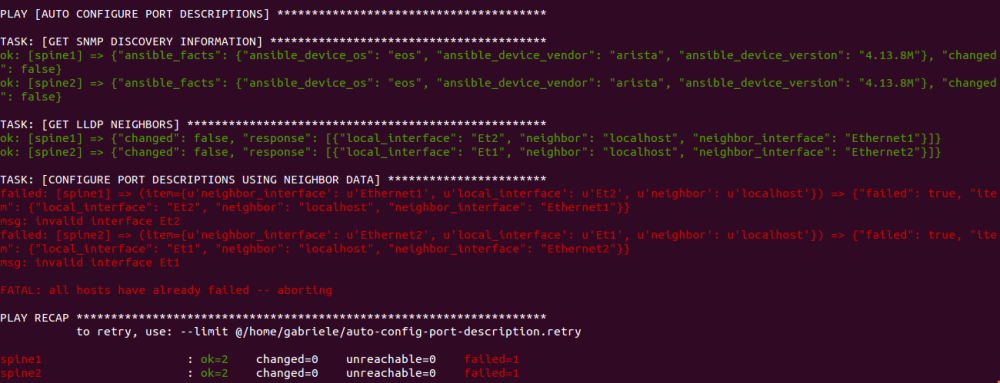
If we run the current playbook with a -v check, we’ll be able to see all the params returned from run:

check

Here we can see how Ansible discovers what kind of device are these in the first task. But here we are more interested on the second one. In fact, we can notice that local_interface param is set to Et1 and Et2. These values are returned by eos_interface and that’s where I’m gonna try to work to solve the issue.

Ansible Filters

From Ansible: Up and Running:

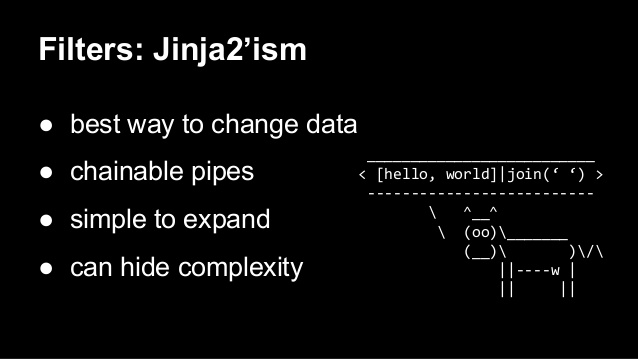
Filters are a feature of the Jinja2 templating engine. Since Ansible uses Jinja2 for evaluating variables, as well as for templates, you can use filters inside of {{ braces }} in your playbooks, as well as inside of your template files. Using filters resembles using Unix pipes, where a variable is piped through a filter.

What I want to do, is to build a filter to change what Ansible returns.

The basic syntaxt of a filter is this:

{{ some_variable | some_filter }}

Here, some_variable is a variable passed or returned back from Ansible. Then, we apply some_filter to our variable and the result is given back to us. Ansible already have lot of built-in filters and you can take a look at some of them here. But you can also develop your own custom filter! 😉

normalize_interface

This is the content of my normalize_interface.py file, which will become my filter:


from ansible import errors

interfaces = {
        'arista':   {
                    'et': 'Ethernet',
                    'ma': 'Management',
                    'lo': 'Loopback'
                },
        'hp':       {
                    'gi': 'GigabitEthernet',
                    'te': 'Ten-GigabitEthernet',
                    'fo': 'FortyGigE',
                    'lo': 'LoopBack',
                    'br': 'Bridge-Aggregation',
                    'ro': 'Route-Aggregation',
                    'tu': 'Tunnel'
                }
        }

def _get_interface(interface):
    splitted_interface = interface.split(' ')
    if len(splitted_interface) == 2:
        int_number = splitted_interface[-1].strip()
        int_type = splitted_interface[0].strip().lower()
        if len(int_type) > 2:
            int_type = int_type[0:2]
    else:
        for i in range(0, len(interface)):
            if interface[i].isdigit():
                int_type = interface[0:i].lower()
                if len(int_type) > 2:
                    int_type = int_type[0:2]
                int_number = interface[i::]
                break
    return (int_type, int_number)

def normalize_interface(interface, vendor):
    try:
        interface_type, interface_number = _get_interface(interface)

        interfaces_dict = interfaces[vendor]
        fixed_interface_type = interfaces_dict[interface_type]

        fixed_interface = fixed_interface_type + interface_number
        return fixed_interface
    except Exception, e:
        raise errors.AnsibleFilterError(
                'normalize_interface plugin error: {0}, interface={1},'
                'vendor={2}'.format(str(e), str(interface), str(vendor)))

class FilterModule(object):
    ''' A filter to fix interface's name format '''
    def filters(self):
        return {
            'normalize_interface': normalize_interface
        }

The normalized_interface function defines the Jinja2 filter. It accepts 2 params, interface and vendor which are passed in different ways (we’ll be back on this soon).

More from Ansible: Up and Running:

The FilterModule class defines a filters method that returns a dictionary with the name of the filter function and the function itself. The FilterModule class is Ansible-specific code that makes the Jinja2 filter available to Ansible.


{{ item.local_interface | normalize_interface("arista") }}

The above line is an examble of how to call the filter against an interface. As I said, the normalize_interface accepts 2 args: the first, item.local_interface, is passed automatically using the pipe “|“, while the second one, arista, is passed explicitly.

After the filter is called as above,  the FilterModule class calls the proper function. Here, the first thing we do is to call another function, _get_interface, to split interface types and numbers.

As you can see, I’ve defined one dictionary with two nested dictionaries. Here I added support for Arista and HP too. The goal should be to write something general instead of Arista specific, so we can add even more vendors.

Once we splitted our interface with _get_interface, we extract vendor information and then we use the above dictionary to normalize our interface type. After this, the fixed interface is returned.

Now, let’s try our filter:

- name: CONFIGURE PORT DESCRIPTIONS USING NEIGHBOR DATA
        eos_interface:
          name={{ item.local_interface | normalize_interface("arista") }}
          description="Connects to {{ item.neighbor_interface }} on {{ item.neighbor }}"
          connection={{ inventory_hostname }}
        with_items: neighbors.response

Results:

success

As I said before, we may want to make it even more general. We could choose another approach, instead of keep adding vendor dictionaries.

In fact, we can notice how most of the interface’s name are quite similar even between different vendors: for example, an interface whose name starts with et is 99.9999% an ethernet interface, regardless the vendor. So, we could also have a big dictionary like this:

interfaces = {
        'as': 'Async',
        'br': 'Bri',
        'di': 'Dialer',
        'et': 'Ethernet',
        'fa': 'FastEthernet',
        'fd': 'Fddi',
        'fo': 'FortyGigE',
        'gi': 'GigabitEthernet',
        'hs': 'Hssi',
        'lo': 'Loopback',
        'ma': 'Management',
        'mg': 'Mgmt',
        'nu': 'Null',
        'po': 'Port-Channel',
        'ro': 'Route-Aggregation',
        'se': 'Serial',
        'te': 'TenGigabitEthernet',
        'tu': 'Tunnel',
        'vl': 'Vlan',
        'vx': 'Vxlan',
    }

Anyway, we’d need to pay attention to some limit cases: for example, a 10G port is a TenGigabitEthernet for Cisco but it’s a Ten-GigabitEthernet for HP. So, we may want to work a little bit more on this 😉

So, what do you think about this? How would you make it better and more general? 🙂


So you want to start with Network Automation…

As we all know, things in networking are changing rapidly and so is changing the needed skillset for those who manage networks.

I’m definitely not an expert (I’m far from it) but lately many people asked me how to start with Network Automation. Now I’ve just received a message from a LinkedIn’s friend asking for something like this and I suddenly realized this would be a nice topic to write about 🙂

In this post I’ll briefly summarize what you need to start your journey (or, at least, what I used to start mine).

Python

Even if we may be still far to deploy Software Defined Networks everywhere, software managed networks are a real thing and Python is the core of them.

Python is a pretty well-know programming language which is loved for its ease of learning. I’ve studied C and Java at university and hated both of them, while I simply love Python 🙂

There are plenty of available resources for those who wish to study for free and the following is a little list of stuff I’ve personally used:

  • CodeAcademy: really nice course to start your journey. It let you approach the language in a very practical way. Anyway, it does not dig very deep into the language.
  • Coursera: the website is full of Python courses, from the basics to more advanced topics. I’ve attended a couple of them and I really appreciated them.
  • How to think like a computer scientist: this was the very first Python resource I’ve ever used. It is a very well written book covering all the foundation in a pretty deep and clear way.
  • Dive Into Python: this is a more advanced book for those of you who are hungry of knowledge.

I’m sure the list of someone else would look completely different since there are so many resources out there. So just pick one of them and start 🙂

APIs

Networking vendors have developed specialized APIs to help engineers interact with their devices. I’ll introduce some of them within this section.

Juniper PyEZ

Juniper is working hard on automation and has developed the PyEZ library, supported by almost every JunOS device. Once you installed all the requirements, it’s really easy to start talking to your remote device:


>>> from jnpr.junos import Device
>>> from jnpr.junos.utils.config import Config
>>> from pprint import pprint
>>> my_device = Device(host='172.16.1.1', user='gabriele', password='gabriele')
>>> my_device.open()
Device(172.16.1.1)
>>> pprint(my_device.facts)
{'2RE': False,
'HOME': '/var/home/gabriele',
'domain': None,
'fqdn': 'Router1',
'hostname': 'Router1',
'ifd_style': 'CLASSIC',
'model': 'olive',
'personality': 'UNKNOWN',
'serialnumber': '',
'switch_style': 'NONE',
'vc_capable': False,
'version': '12.1R1.9',
'version_info': junos.version_info(major=(12, 1), type=R, minor=1, build=9)}

Here there are some other practical reference about it:

Cisco

Cisco is working toward enabling automation in today’s network as well (of course).

Cisco NX-API

If you want to talk to Cisco NX-OS devices, you can use their NX-API.

Jason Edelman did an awesome work on both introducing NX-API here and developing another API called pycsco that simplifies working with Cisco NX-OS switches that support NX-API.

Here you can also find the latest reference from Cisco itself: NX-API book.

Cisco IOS-XR

Elisa Jasinska developed an API to help interact with Cisco devices running IOS-XR. It’s called pyIOSXR.

Arista EOS

If you want to use Arista EOS, you can pick eAPI. You can also find some references here and on Packet Pushers.

Netmiko

Another super useful tool is Netmiko. It’s not a specialized API but instead it’s used to send commands to network devices and retrieve their output. That’s a great resource for those who want to start with network automation and I’ve extensively used it in pretty much every project I’ve done.

In addition, the list of supported devices is huge:

Cisco IOS
Cisco IOS-XE
Cisco ASA
Cisco NX-OS
Cisco IOS-XR
Cisco WLC (limited testing)
Arista vEOS
HP ProCurve
HP Comware (limited testing)
Juniper Junos
Brocade VDX (limited testing)
F5 LTM (experimental)
Huawei (limited testing)
A10 (limited testing)
Avaya ERS (limited testing)
Avaya VSP (limited testing)
OVS (experimental)
Enterasys (experimental)
Extreme (experiemental)
Fortinet (experimental)
Alcatel-Lucent SR-OS (experimental)

Netmiko’s been developed by Kirk Byers and he also wrote an amazing post on how to use it. Thank you Kirk 🙂

NAPALM

This name shouldn’t sound new to you! 😉

In fact, I’ve extensively talked about NAPALM (Network Automation and Programmability Abstraction Layer with Multivendor support) in my previous post.

If you didn’t read it, repent, go read it and come back here 🙂

Automation tools: Ansible

Like NAPALM, this shouldn’t sound new! I’ve talked about Ansible in two of my previous posts (here and here).

Anyway, those posts could be difficult to understand if you’re completely new. In this case, don’t worry, you definitely can be guided by Kirk and Jason (these two guys are awesome!):

  • Kirk wrote a very nice guide introducing Ansible playbooks and templates, splitting it into 3 parts (Part1, Part2, Part3). This is what I used to write my first blog post on Ansible (see just above).
  • Jason extensively wrote about Ansible basics (this post is precious for those who just started to use the tool) and other more advanced applications as well (here, here and here).

Have I already said that these two are awesome? 🙂

Fast-paced Courses

Last but not least, if you really want to boost your automation skills and have enough resources (or you’re lucky enough to receive support from your company) you may want to attend live classes on Network Automation.

Jason Edelman si delivering an awesome Network Programming and Automation course all around the world. It covers everything you need to move from novice, writing your first “Hello World!” in Python, to NetOps Ninja developing a working network automation Flask app.

During the course you’ll not just sit there listening to Jason, but you’ll go through 10+ hours of labs too. I’ve reviewed the whole lab section and it took me almost the full 10 hours to complete it (and I was not new to most of the topics!). So I think you can expect to spend at least 2 extra hours on this.

Summarizing: 4 days digging deep on Python and Network Automation including some cool tools like Ansible + 12 hours of practical labs + guidance from Jason Edelman, one of the most expert guy on the field = How cool is this?  😀

tweet

Here it is the course schedule for the first part of the next year. Don’t miss it! 😉

 Conclusion

These are just some of the available resource I used to start my journey with NetOps. There are tons of more resources out there if you want to start practicing Network Automation or simply improve your coding skills so you have no excuses! Choose what you want and just start! 🙂

start


Adding Cisco IOS support to NAPALM (Network Automation and Programmability Abstraction Layer with Multivendor support)

If  you’re a networking passionate I’m pretty sure you’ve already heard about NAPALM (no, I’m not talking about the flammable liquid used in warfare 🙂 ). Anyway, if you’ve not yet, you’re going to discover a very nice project for network automation.


NAPALM

What is it? Let’s quote its documentation page:

NAPALM (Network Automation and Programmability Abstraction Layer with Multivendor support) is a Python library that implements a set of functions to interact with different network device Operating Systems using a unified API.

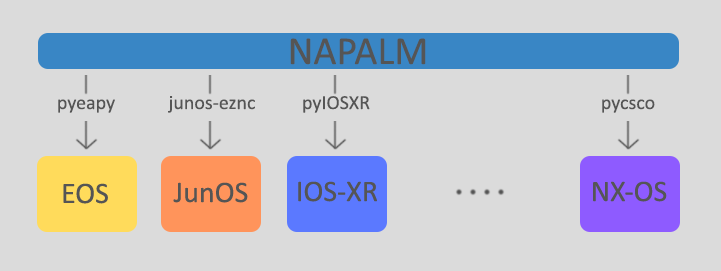
It’s a project developed by David Barroso and Elisa Jasinska (thank you guys 😀 ), owned by Spotify and, as the quote says itself, it is used to interact with different hardware networking vendors. Basically, it works like an API on top of other APIs, adding another level of abstraction.

Lately, many vendors have developed APIs to making it easier to interact with their equipments. For example, most of the JunOS devices support Juniper PyEZ, and so do Cisco’s Nexus with its NX-API.

This way, if I want to interact with a Juniper device I can use PyEZ, whereas I’d use NX-API if I wish to talk with a Nexus switch, and the example continues with other specialized APIs.

What NAPALM does is hiding this layer unifying the way we access a networking device, regardless who built it.

napalm

Back to few days ago, NAPALM supported the following network OS:

  • Arista EOS
  • Juniper JunOS
  • Cisco IOS-XR
  • Cisco NX-OS
  • Fortinet FortiOS
  • IBM OS

This is possible thanks to the introduction of the NetworkDriver concept. Every time we want to interact with a device, we can only specify what OS we are going to talk to and NAPALM will select the correct NetworkDriver (basically, a library with all the functions related to that OS).

>>> from napalm import get_network_driver
>>> get_network_driver('eos')
>>>
>>> get_network_driver('iosxr')
>>>
>>> get_network_driver('junos')
>>>
>>> get_network_driver('fortios')

NAPALM will still use third party APIs but this will be trasparent to the user.

Cisco IOS support

Unlike NX-OS, Cisco IOS have no API support. Therefore, it’s not that straightforward to obtain structured data from it and at first NAPALM didn’t support it. So I thought this could be a nice spot to play 🙂

I forked the main repository and started to code.

IOSDriver

Since no native API exists, I had to use something more general: netmiko. This is a pretty sweet Python library making it super easy to connect and interact with networking devices. Once a command is sent, netmiko can give me back the output and then I can start to filter and parse it.

The module is composed by 12 methods:

  • open(): opens the connection with the remote device. It is the first method to be used.
  • close(): closes the connection with the remote device.
  • load_merge_candidate(filename, config): loads a candidate configuration from a textfile or a configuration string. If both are passed, filename is picked. At this point no configuration is pushed to the device yet.
  • compare_config(): simply shows the list of commands proposed by the load_merge_candidate method and ready to be executed if commited.
  • discard_config(): what if we notice some errors after the compare_config? We can discard the proposed changes using this method.
  • commit_commit(): pushes the configuration from load_merge_candidate and saves the configuration.
  • rollback(): we can rollback the commited changes using this method. This simply adds the no keyword to commands (anyway it’s smart enough to recognize parent/child commands)
  • get_lldp_neighbors(): extracts lldp neighbors information from the device.
  • get_facts(): extracts information like uptime, vendor, os_version, serial_number, model, hostname, fqdn, and interface_list.
  • get_interfaces(): extracts information about interfaces including status and speed.
  • get_bgp_neighbors(): extracts information about BGP neighbors.
  • get_interfaces_counters(): extracts information about counters.

Demo

Now let’s see an example of how to use NAPALM.

The first thing we’re gonna do is to connect to our remote device specifying the OS type, username, password and IP address.


from netmiko import ConnectHandler
from napalm import get_network_driver
get_network_driver('ios')
driver = get_network_driver('ios')
device = driver('172.16.1.1', 'gabriele', 'gabriele')
device.open()

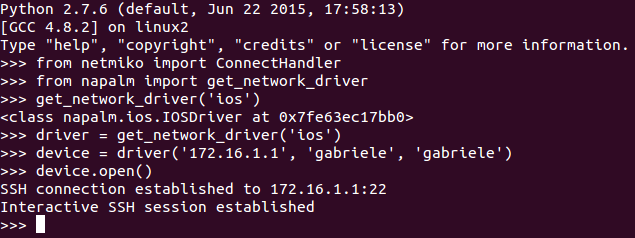
Once we’re done, if everything went fine we’ll see the Python interactive shell confirming the SSH session has been established.

python1

Now we can start to interact with our device. Let’s ask for some facts, for example:

python2

As we can see, it’s a Cisco 3640 device whose IOS version is 12.4(16). It has 3 interfaces and its uptime value is set to 9 minutes.

Cool, right? 😀

Let’s try some other methods:

python3

Earlier we discovered 3 interfaces exist in our device. Now we’ve just obtained some specific information about them using the get_interfaces() as well as BGP neighbors information thanks to get_bgp_neighbors().

Let’s see how NAPALM can help us with configuration management. Imagine we want to implement OSPF on our network. Just to keep it simple, we want to push the following configuration:


router ospf 1
!
network 0.0.0.0 0.0.0.0 area 1
!

Using load_merge_candidate(filename=new_good.conf), we’ll load our configuration (assuming new_good.conf is the textfile containing the above config). Then, we can see what changes would be implemented using compare_config(). At that point, we can decide to either commit or discard these changes.

Here we’ve sudden realized our OSPF area should be and not 1. So we decide to discard the candidate configuration with discard_config(). We can use compare_config() to confirm that every possible change’s been discarded.

python4

Since our last compare_config() doesn’t show anything, it means everything went fine.

Anyway, we still want to implement OSPF, so we fix the configuration and give it another try. This time we want to use a configuration string instead of a .conf file. We do this with load_merge_candidate(config=’router ospf 1\nnetwork 0.0.0.0 0.0.0.0 area 0′). Then, if we are happy with it, we can commit.

python5

..and this is how the router’s config look like:

python6

At this point, if we want to rollback the change we can simply use rollback().

Conclusion

It’s been lot of fun to work on this patch and I’m happy to announce that now NAPALM supports IOS too since my PullRequest has been merged to the main repo 🙂

NAPALM is a really cool project and it’s popular among NetOps community and it’s also been presented at a NANOG conference. Here you can find the video from the awesome guys who actually designed and implemented it. Enjoy 🙂


P.S.

If you’re interested about NAPALM or Network Automation in general you should definitely join the SLACK channel at network.toCode(). Here you’ll find lots of cool guys discussing fancy stuff on networking 🙂


Cisco Incubator Program – How to build a router

It’s been a while since my last post. I’ve been really busy with work (I’ll talk about this in another post 🙂 ), university stuff and I didn’t manage to find the time to write here, even if I have some pending articles to review and share soon.


Webinars

If you’re following my journey, you already know I’m now part of the Cisco Incubator Program.  The program started few weeks ago with some interesting webinars about technical and non-technical topics. If you’re willing to learn new things and improve your skills thanks to the help of Cisco engineers, you can attend these webinars too, since they are public.

You can follow all the program updates and incoming/recorded sessions inside the Cisco Engineer Incubator page on Facebook.

There you can already find the following records:

Seminars

Seminars are the key part of this program.

Basically, once a month, you’re invited to the nearest Cisco office to attend a full-day (6 hours + 1 hour lunch) seminar with Cisco engineers. Being a project running on several European countries, every office will be connected to Krakow (the main office) via Telepresence, where engineers will deliver the seminar.

Last thursday I attended the first one and now I’ll tell you how cool it’s been 🙂

How to build a router

Since I live in Catania, the nearest Cisco office is the one in Rome. So I need to take a flight every time to reach it. Because of this, I decided to attend this first seminar via WebEx from home, to save on flight expenses. Anyway, I’ve already booked the tickets for December and January seminars 🙂

The seminar was held by Wojciech Róg, a Customer Support Engineer working at Cisco TAC and the extended title was: How to build a router: the main principles or router architecture.

Anyway, the actual seminar was preceded by an introduction from Kamila Wegrzyn, our Project Manager for this program. She started introducing us all the people behind the program and their function inside it. Then she explained all the project benefits and expectation. I can only say that after her talk I was even more excited to start 🙂

After this part, Wojciech introduced himself and asked every one of us (around 20+ people from all over the Europe) to introduce ourself to the rest of the group. It was nice to see some familiar faces from the Assessment Centre day.

Then, we went technical!

The seminars was divided in 3 main parts:

  • The beginning
  • The middle
  • The future

The beginning

This part was designed to review the key concepts of how IOS works and its architecture. Why is it designed in this way? What are the benefit? What is missing?

This broadly covered both hardware and software aspects. It was really interesting to understand how things work inside the box.

During this phase Wojciech asked a lot of questions and gave us mini assignments, like “Ok, during the next 5 minutes you have to think about how we can improve our product and present it“. I think this was really useful to both involve us and make us think.

The middle

This part was designed to explain how Cisco improved IOS, switching from some paradigms to others and how it culminated developing IOS-XE and ASR1000.

This time we went really deep into the ASR1000 architecture: internal components communication, control plan/data plane separation,  modular designs etc.

We then focused on 3 key components: RP, ESP and SIP. We digged deep into both hardware and sofware sides.

The future

This last part was about Cisco vision for future applications.

But first, Wojciech asked again how we could move to the future and present it to the group.

He then exposed us to the Cisco vision and to the Cisco ISR 4000. Again, we went deep on this 🙂 Here he explaned how the router treats an incoming packet, letting ut understand all the internal communications when such event occour.

I got really interested about the FIA (Feature Invocation Array): basically, when a packet is dropped, it happend at a certain point into the packet processing. The FIA is an array containing the sequence of all the features that a packet needs to be processed by in order to be delivered out of the router. This mean that if the packet is dropped, we can know exactly at what point it has been discarded if we know how the FIA looks like.

Conclusions

The seminars has been awesome. Topics were interesting and Wojciech  managed to present them in the clearest way possible. Also, the way he involved us has been great in order to keep us active (you’ll feel tired after several hours, but you’re keeped engaged).

Next seminar will be on December 17th with the title “Introduction to Cisco Collaboration through Voice and Video”, and I can’t wait to attend it at Cisco office in Rome 🙂

maxresdefault

Enabling Network Automation using NTC-Ansible

A couple of months ago I wrote about Ansible and how it can enhance network automation. I also did a (very) little multi-vendor lab to show an example of what can be achieved with this tool.

Today I’m gonna write about an interesting project called ntc-ansible which exploits Ansible awesomeness into networks.

NTC-ANSIBLE

It’s an Open Source project launched by Jason Edelman (LinkedIn page, Blog) and his new-founded company Network to Code (it couldn’t have a better name 😀 ). You can find and download it here. It’s mainly composed by 2 module: ntc_show_commands and ntc_config_commands.

ntc_show_commands

The problem is this: most of the network equipments, doesn’t matter the vendor who made them, don’t return structured data like XML or JSON back from show commands but just simple text. This can be painful if you want to automate some task, like gaining devices’ inventory information. A possible solution could be writing a Python module that would connect to your devices using SSH API, execute commands, retrieve output and, finally, parse the output using Regular Expressions. This is OK, but it’s a lenghty and not always simple procedure.

Ntc-ansible want to simplify all the above.

“ntc_show_commans is a multi-vendor module that can automate converting raw text from show commands into structured data, namely JSON.”

How? This module exploits another interesting tool called TextFSM which is a “Python module that implements a template based state machine for parsing semi-formatted text.” Basically, it takes two inputs, a raw file containing a show command output and a well defined template, and it returns a list of records that contains the data parsed from the text.

So, using ntc-ansible’s ntc_show_commands module we can write a simple Ansible playbook to obtain structured data from network devices in an easy way. Then, we can also use those data to do whatever we want (we’ll see an example of this later on this post).

Example:


- ntc_show_command:
    connection:ssh
    platform:cisco_nxos
    command:'show vlan'
    host:{{ inventory_hostname }}
    username:{{ username }}
    password:{{ password }}

ntc_config_commands

This module enables us to write commands to devices that don’t have API. This can be done in two ways: specifying a list of commands or passing a file containing the commands to be executed. This is an useful module and later I’ll show an example of how this can help to do some auto-remediation.

Example:

# write vlan data
- ntc_config_command:
    connection: ssh
    platform: cisco_nxos
    commands:
      - vlan 10
      - name vlan_10
      - end
    host: "{{ inventory_hostname }}"
    username: "{{ username }}"
    password: "{{ password }}"
    secret: "{{ secret }}"

# write config from file
- ntc_config_command:
    connection: ssh
    platform: cisco_nxos
    commands_file: "dynamically_created_config.txt"
    host: "{{ inventory_hostname }}"
    username: "{{ username }}"
    password: "{{ password }}"
    secret: "{{ secret }}"

Auto-Remediation with NTC-Ansible

The above introduction is far to be enough to let you understand how this tool really works and what it really does. So, in this section we’ll move together across all the steps needed to implement a simple auto-remediation.

Scenario

A common routine task is to take a network node offline gracefully. This can be done prepending AS_PATH in BGP. Let’s imagine something happened into our network requiring us to drain traffic from a device (like a fan problem or something else). We’ll exploit ntc-ansible to write an Ansible playbook to achieve it (this can also be automatically triggered to be fully automated, but let’s focus on the playbook for now).

A common BGP prepending configuration looks like this (actually this is the one I have configured on my virtual lab):


route-map prepend permit 10
set as-path prepend last-as 3

router bgp 10
neighbor 172.16.2.2 remote-as 20
neighbor 172.16.2.2 route-map prepend out
neighbor 172.16.3.2 remote-as 30
neighbor 172.16.3.2 route-map prepend out

So, we’ll need to write a template extracting BGP neighbors information (from the show ip bgp summary command). We’ll achieve this using the ntc_show_commands module. Then, we’ll need to generate the proper configuration and to push it to the device using the ntc_config_commands module.

But first, we have to write a template for our show command.

TextFSM Template

The template file consists of two top level sections.

  • The Value definitions, which describe the columns of data to extract.
  • One or more State definitions, describing the various states of the engine whilst parsing data. A set of rules is defined in order to perform the parsing. The first and mandatory State is Start.

You can find a great guide on how to write one here.

My show ip bgp summary output looks like this:

BGP router identifier 1.1.1.1, local AS number 10
BGP table version is 21, main routing table version 21
7 network entries using 819 bytes of memory
8 path entries using 416 bytes of memory
3/2 BGP path/bestpath attribute entries using 372 bytes of memory
1 BGP AS-PATH entries using 24 bytes of memory
0 BGP route-map cache entries using 0 bytes of memory
0 BGP filter-list cache entries using 0 bytes of memory
BGP using 1631 total bytes of memory
BGP activity 9/2 prefixes, 13/5 paths, scan interval 60 secs

Neighbor      V   AS   MsgRcvd   MsgSent   TblVer  InQ OutQ    Up/Down State/PfxRcd
172.16.2.2   4   20       297             435          21       0      0        06:48:44         3
172.16.3.2   4   30       409             414          21       0      0        06:45:40         0

I have highlighted the field I’m interested in. These are my Values. Now I need to define RegEx for them.


Value BGP_NEIGH (\d+\.\d+\.\d+\.\d+)
Value NEIGH_AS (\d+)
Value STATE_PFXRCD (\S+)

Start
^${BGP_NEIGH}\s+\S+\s+${NEIGH_AS}.*\s\d+:\d+:\d+\s+${STATE_PFXRCD} -> Record

Regular Expressions on Value lines are used to define what we are interested in, while those inside the State are used to find the defined pattern inside each output line. We’ll save this new template inside the ./ntc_templates directory. This directory contains all the commands supported by the ntc_show_commands module as well as an index file with a list of them. Each line of this file is in this format:

cisco_ios_show_ip_bgp_summary.template, .*, cisco_ios, sh[[ow]] ip bgp sum[[mary]]

The highlited RegEx is used to select the rigth template based on the chosen command inside the playbook.

Playbooks

Using this template I’ll have a table with the selected values. Now I can make a first test with ntc_show_commands


---

- name: GET STRUCTURED DATA BACK FROM CLI DEVICES
  hosts: cisco_ios
  connection: local
  gather_facts: False

  tasks:
    - name: TEST TEMPLATE
      ntc_show_command:
        connection: ssh                   
        platform: cisco_ios               
        command: "show ip bgp summary"   
        host: "{{ inventory_hostname }}"  
        username: "{{ username }}"
        password: "{{ password }}"
      register: results

    - debug: var=results.response

On the same directory I have an inventory file looking like this:

[cisco_ios]
172.16.1.1 username=cisco password=cisco secret=cisco

[cisco_ios:vars]
as = 10

If you are familiar with Ansible all the fields are self-explanatory. Running this we’ll obtain the following:

ansible1

As we can see, the command has been correctly executed and data is well parsed in a JSON-like manner. Now we can decide to use these data to do whatever we want.

Our goal is to drain traffic from the device making it less prefered through BGP AS prepending. So, we need to configure AS prependig for every BGP neighbor. Thanks to ntc_show_commands now we know who BGP neighbors are and we can use this knowledge to build the proper configuration.

We write two other task in order to do so:


    - name: BUILDING CONFIGURATION
      lineinfile: dest=./drain.config line="router bgp {{ as }}\nneighbor {{ item['bgp_neigh'] }} route-map prepend out" state=present create=True
      with_items:
        - "{{ results.response }}"

    - name: ADDING ROUTE-MAP
      lineinfile: dest=./drain.config line="route-map prepend permit 10\nset as-path prepend last-as 3"

The first one builds the actual BGP configuration and store it inside the drain.config file. The state flagsetted to present, and the create flag, setted to True, let the playbook create a new file if it does not exist yet. Let’s run the expanded playbook now:

Senza titolo-7

If the playbook works fine, the drain.config file will appear like this:

router bgp 10
neighbor 172.16.2.2 route-map prepend out
router bgp 10
neighbor 172.16.3.2 route-map prepend out

route-map prepend permit 10
set as-path prepend last-as 3

At this point we write the ntc_config_commands task to configure our device:


    - name: PUSH CONFIGURATION
      ntc_config_command:
        connection: ssh
        platform: cisco_ios
        commands:
          - router bgp "{{ as }}"
        commands_file: "./drain.config"
        host: "{{ inventory_hostname }}"
        username: "{{ username }}"
        password: "{{ password }}"
        secret: "{{ secret }}"

..and now let’s run it again..

Senza titolo-9

As the screen shows, everything has been successful and we can verify it from a show ip bgp on a neighboring device (of course we could do this inside the playbook itself writing another task. Ignore BGP configuration, I’ve just built a sample lab to show ntc-ansible usage).

Senza titolo-4

..and inside red circles we can see the effect of our run.

Conclusions

This post wanted to be a practical introduction to ntc-ansible and a way to let me do some practice with its modules. I think this project to be really interesting and it’s also receiving lot of good feedbacks from people who are already using it in their environments.

Senza titolo-2

If you find interesting too, you can contribute writing more templates. I did it and I’m doing it right now 🙂